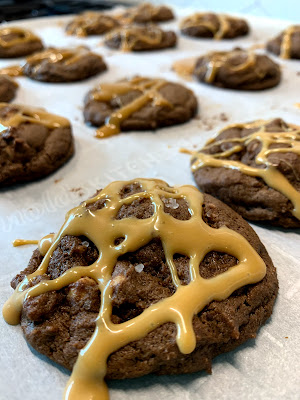
very delicious tahini chocolate chip cookies

7.14.2020

As previously documented, I've grown quite a fondness for chocolate chip cookies... and specifically having them at the ready in the freezer. I'm currently on my second batch of these tahini cookies and see many more in my future.

I found these by pretty much just looking for unique chocolate chip cookies. There is a New York Times recipe that gets top billing on Google, but I hate paywalls.... so I ended up on Food52. The real hidden gem of this recipe is that it has no dairy in it. It could not be easier. Often when getting ready to make cookies I find myself waiting for frozen butter to defrost. A rather terrible punishment. 

The only bad part of this recipe is that tahini is not normally on my grocery list. I'm not quite sure where to find it at my local grocery store. A problem that I'm willing to solve because these are just that good.

8 ounces tahini (1 scant cup)
1 cup sugar
2/3 cup brown sugar
2 large eggs
3 tablespoons cold water
2 teaspoons vanilla extract
1 1/4 teaspoons kosher salt
3/4 teaspoon baking soda
2 cups all-purpose flour
2 cups bittersweet chocolate chunks 
  1. Heat the oven to 375° F. Line a couple sheet pans with parchment or silicone mats.
  2. Combine the tahini, sugar, and brown sugar in the bowl of a standing mixer fitted with the paddle attachment. Mix on medium for a couple minutes, scraping down with a rubber spatula once or twice. It will be crumbly, not creamy.
  3. Add the eggs, water, and vanilla extract. Continue to mix on medium for another couple minutes, again scraping every so often. 
  4. Add the salt and baking soda. Mix on low just to combine. Add the flour and mix until almost combined. Now add the chocolate chips and mix again.
  5. Scoop rounded tablespoons of dough onto the prepared sheet pans. Bake for 9 to 11 minutes until the edges are turning golden brown but the centers are still tender. 

rhubarb blueberry anytime cake

7.09.2020

Fun fact? I've had some rhubarb in my fridge for quite some time just begging for a tasty recipe. But it wasn't until I was on a random Zoom call this week for a consulting project that I got the right inspiration. A girl I was meeting with commented that her morning was starting off great because she had just eaten some rhubarb cake ... and with that I was off and running.

The original recipe comes from Smitten Kitchen but I tweaked it a bit to fit what I had in my house. I was out of sour cream and I didn't have any lemons. I also love blueberries in baked goods so it was a must they be added. The blueberries are actually left over from last year's harvest. I always get a kick out of eating from my freezer.

I believe this cake is best eaten with a little bit of ice cream or whip cream. I have eaten it at every time of the day and can confidently say that all you need is a fork to enjoy it. Whip cream is just a nice added bonus.

Cake
1 pound rhubarb, trimmed and cut into 1/2-inch lengths
1/3 pound blueberries
1 1/3 cup granulated sugar, divided
1 tablespoon lemon juice 
1/2 cup butter, softened
2 large eggs
1 1/3 cups  all-purpose flour
1 teaspoon baking powder
3/4 teaspoon table salt
1/4 teaspoon ground ginger
1/3 cup heavy cream / whole milk (something like that)

Crumb
1 cup all-purpose flour
1/4 cup brown sugar
1/4 teaspoon ground cinnamon
4 tablespoons butter, melted
  1. Preheat your oven to 350°F. Coat the bottom and sides of a 9×13-inch baking pan with butter or a nonstick cooking spray, then line the bottom with parchment paper, extending the lengths up two sides.
  2. Stir together rhubarb, blueberry, lemon juice and 2/3 cup sugar and set aside. 
  3. Beat butter, remaining sugar and lemon zest with an electric mixer until light and fluffy. Add eggs, one at at time, scraping down the sides after each addition. Whisk together flour, baking powder, 3/4 teaspoon table salt and ground ginger together in a small bowl. Add one-third of this mixture to the batter, mixing until just combined. Continue, adding half the milk, the second third of the flour mixture, the remaining sour cream, and then the remaining flour mixture, mixing between each addition until just combined.
  4. Dollop batter over prepared pan, then use a spatula — offset, if you have one, makes this easiest — to spread the cake into an even, thin layer. Pour the rhubarb mixture over the cake, spreading it into an even layer (most pieces should fit in a tight, single layer).
  5. Stir together the crumb mixture, first whisking the flour, brown sugar, table salt and cinnamon together, then stirring in the melted butter with a spoon or fork. Scatter evenly over rhubarb layer. Bake cake in preheated oven for 50 to 60 minutes. It will be golden on top. 

coconut cake with marshmellow frosting

7.07.2020

I had the great honor recently to make a gender reveal cake. I spent a good amount of time thinking about this task. My primary goal was to make a delicious cake that didn't immediately reveal whether it would be blue or pink inside. I didn't want the recipient to know immediately once the knife hit the cake.

The end result was a funfetti coconut layer cake. I only made the middle layer blue so as to minimize the excessive amount of food coloring. The other special part of this cake was the marshmallow frosting. I have never made this before and will absolutely be making it again soon. The frosting was very easy to make provided you have a candy thermometer. This cake provided a great opportunity to baptize my offset frosting spatula. 

This cake is rather unique but really quite great. It's been about a month since I first made the cake so it is hard to remember exactly but it has a slightly different texture given it is dairy free and uses only egg whites. When combined with the marshmallow frosting it is really a home run. I made myself a little cake bite with the leftover trimmings and dear lord was that delicious.

coconut cake ingredients (from Baking A Moment)
2 1/2 cups all-purpose flour
1 1/2 cups sugar
1 tablespoon baking powder
1 teaspoon kosher salt (scant)
13.66 fluid ounces coconut milk (1 can)*
1 cup oil (any neutral-flavored oil that is liquid at room temp will work)
2 egg whites (large)
1 1/2 teaspoons coconut extract
  1. Preheat the oven to 325 degrees F, lightly mist three 6-inch diameter cake pans with non-stick spray, and line them with circles cut from parchment.
  2. Place the flour, sugar, baking powder, and salt in a large mixing bowl, and whisk to combine.
  3. Place the coconut milk, oil, egg whites, and coconut extract in another bowl, and whisk to combine.
  4. Add the coconut milk mixture to the flour mixture, and whisk together until smooth.
  5. Divide the batter equally between the 3 prepared pans, and bake the cakes until a toothpick inserted in the thickest part comes out clean (about 35 to 45 minutes).
  6. Cool completely, then fill and frost the cake with marshmallow frosting and coat it with shredded coconut.
marshmallow frosting ingredients (from Baking A Moment)
5 egg whites, large
1/2 teaspoon cream of tartar
pinch of salt
2 cups sugar, divided
2 teaspoons vanilla extract
2/3 cup water
  1. Place the egg whites, cream of tartar, and salt in a large mixing bowl and whip on medium speed until foamy.
  2. While continuing to whip, add 1 cup of the sugar in a very slow and steady stream (about 1 teaspoon at a time).
  3. Once the entire cup of sugar has been added, continue to whip until the meringue can hold stiff peaks.
  4. Whip in the vanilla extract, and continue to stir the meringue on low speed while you prepare the hot sugar syrup.
  5. Place the remaining 1 cup of sugar in a small pot, along with the water.
  6. Place the pot over medium heat and cook until the syrup boils and reaches 235 degrees F.
  7. In a very slow and steady stream, add the hot sugar syrup to the meringue, while continuing to whip on low speed.
  8. When all the syrup has been added, turn the mixer up to high speed and whip until very stiff and glossy.

seasonal love affair

7.06.2020

I'm not sure if peony season came on schedule this year or not, but it did show up and that is frankly all that matters.

My peony plants on the South side of the house had such a strong showing in their second year. Very proud of those babes. The only downside is they get so much sun that the season for them feels faster than the rest of my neighborhood. The good news is that I have other peonies that I can easily access to get my sniff on. My Aunt kindly lets me steal time with her peonies ... which we've since learned Siri autocorrects to "panties". 

My peony inventory:
  • 6 on the South Side, year 2 of blooming. bought from Lowe's. added cages for support this year. fertilized with a low nitrogen fertilizer in the spring and fungicide last fall.
  • 2 on the North Side, year 1 of blooming. bought them from Whole Foods last year. Minimal blooms but it was the first year. added cages for support this year. fertilized with a low nitrogen fertilizer in the spring and fungicide last fall. 
  • Recently added 2 more to the North Side. bought from Lowe's
For reference, here are some prior peony posts: 20172016201520142013, and 2012.

so it's been a bit


I haven't been blogging in quite some time. It is not as though there hasn't been things to write about either. Plenty of good stuff happening. Perhaps not as many kitchen adventures - but still things to document.

Blogging before used to be a healthy combination of a break from my job and a commuting activity. In the 10 years that I've been blogging, the prior 8 (?) I commuted to a job  ... and in some cases a job that was in a whole other state. So why am I writing less? I think I'm enjoying my life more. I do also have a whole house to take care of. I've started my own consulting business. I'm more social with my neighbors. 

In 2016, I would have spent a July Sunday night sitting on my itty bitty fire escape writing up a post about the weekend or the latest recipe that I made in my wonky North End kitchen. In 2020, I now spend it puttering around my garden, pulling a random weed every couple steps, and catching up with a neighbor over my hedge. I specifically keep my hedge at just the right height for two things: ease of trimming and ease of chatting.

That being said, I have several posts that should be written. I'd like to be a tiny bit better about writing here but I also know that the reasons for not writing as often are pretty wonderful.

italian chicken meatballs

6.01.2020


Feel free to file this recipe under "wonderful for Sunday meal prep". It was a total home run and could not have been easier to pull together. I had all of these ingredients on hand which made it even better. 

This recipe was made even easier by the use of my very handy cookie scooper. The extra bonus to these meatballs was that I quick roasted some frozen tomatoes from last summer's garden. I had previously used these frozen tomatoes in a tomato soup but it was great to know they would be just as delicious mixed into a pasta or other use.
  1. Preheat the oven to 400 degrees F. and line a baking sheet with parchment paper.
  2. In a large mixing bowl, add the sliced onions and tomatoes. Sprinkle with kosher salt and about 1 1/2 tsp fresh thyme (leave the rest of the thyme for later). Drizzle a bit of extra virgin olive oil and toss to combine. Transfer to the prepared sheet-pan and spread well.
  3. In the same mixing bowl, now prepare the chicken meatball mixture. Add ground chicken, garlic, egg, Parmesan cheese, and bread crumbs. Add oregano, paprika, pinch of salt and black pepper, and 1 cup fresh chopped parsley. Drizzle a bit of extra virgin olive oil. Using clean hands, mix well until the chicken meatball mixture is well-combined.
  4. Form the mixture into small chicken meatballs about 1 1/2 tbsp each. Arrange the chicken meatballs on the same sheet pan with the tomatoes and onions.
  5. Bake for 30 minutes or so, or until meatballs begin to turn a beautiful golden brown and the tomatoes collapse. 
Shopping List
1 large red onion, cut into wedges
6 to 7 tomatoes, quartered or cut into wedges
3 tsp fresh thyme leaves, divided
Extra Virgin Olive Oil
Kosher salt
1 1/2 lb ground chicken
3 garlic cloves, minced
1 raw egg, scrambled
1/2 cup freshly grated Parmesan cheese
1/3 cup bread crumbs
2 tsp dry oregano
1/2 tsp sweet paprika
black pepper
1 cup fresh chopped parsley

salted dulce de leche double chocolate cookies


I'd like to introduce you to perhaps one of the most delicious cookies ever. I honestly can't even remember how I found it but I'm so thankful that I did. I was completely unable to exhibit self control around them and consumed four in one evening... and to be clear, there were more consumed earlier in the day.

One reason this recipe caught my eye is because of the dulce de leche. I had a can of this made from my Christmas cookies a couple months earlier. Yikes, five months earlier. I hate waste so I was thrilled to have a nice use for it. I am also thrilled that I saved half of the cookie dough for a rainy day and stashed it in my freezer. 

Here's how it goes.
  1. Preheat oven to 375ºF and line 2 cookie sheets with parchment paper.
  2. In a medium bowl, whisk together the all-purpose flour, unsweetened cocoa powder, baking soda, and salt. Set aside.
  3. Using a mixer beat the unsalted butter, granulated sugar, and light brown sugar together on medium-high speed until light and fluffy.
  4. Add in the eggs and vanilla extract and continue to mix together until well blended. Scrape down the sides of the bowl as needed.
  5. Switching the mixer speed to low, gradually add in your whisked dry ingredients until just combined. Then fold in the chocolate chips and peanut butter chips. If needed, add in a couple tablespoons of milk to add moisture to the mixture. 
  6. Using a spoon or cookie scoop, drop dough by the spoonful leaving 2 inches apart on the lined baking sheets.
  7. Lightly sprinkle the tops of each cookie with the sea salt flakes.
  8. Bake for 8-10 minutes at 375ºF (mine baked for 10 minutes).
  9. Remove from oven and allow to cool.
  10. Drizzle the tops of each cookies with a little caramel sauce or dulce de leche (optional).
  11. Keep stored in an airtight container for up to a week with a slice of bread.
Shopping List
2 1/4 cups of All-Purpose Flour
3/4 cup (50 grams) Unsweetened Cocoa Powder
1 teaspoon Baking Soda
1 teaspoon Salt
1 cup (226 grams) Unsalted Butter, room temperature
1 cup (212 grams) Granulated Sugar
1 cup (198 grams) Light Brown Sugar, packed
2 Large Eggs, room temperature
1 tablespoon Vanilla Extract
2-3 Tablespoons milk (if needed)
1 1/2 cups Chocolate Chips
1 cup peanut butter Chips
Sea Salt Flakes for sprinkling over top of cookies
Dulce de Leche (for drizzling over the top)

egg yolk almond pound cake

5.09.2020

While I am normally fairly decent on food waste, I do have my weak spots. Like the last 10% of a bag of arugula. I'm not quite sure what prevents me from just making the previous salad bigger... but I regularly fail at that.

I'm a consistently bad at using egg yolks. So many of my favorite things to eat require only egg whites and that leaves several sad egg yolks behind. I finally found a recipe that is easy to make, tastes great, and uses egg yolks.

I have regularly googled "recipes that use egg yolks". My eyes got caught on this 12 yolk pound cake... except I only had 4 egg yolks (3 from some failed macarons and 1 from another recipe). All I did was cut the recipe by a third and I was good to go. Because my batter was smaller, I used a 6 inch springform pan as well.

This cake is DELIGHTFUL. It is very reminiscent of a pound cake but with a hint of that super airy-ness and crust that comes from a traditional angel food cake. It's a really neat combo. Another benefit is you can super easily customize this - I think. Want it to be citrusy? Add in some lemon / orange / lime / grapefruit zest. I could also see it being nice with cocoa powder.

Basically, this is a perfect canvas to create your ideal dessert. I served it up with some leftover cool whip and raspberries. Also, everything looks fancier if you dust it in powdered sugar. It's a proven fact.

Here's how it goes.

  1. Prepare a bundt pan with non-stick spray.
  2. Preheat oven to 350 F.
  3. Combine flour, baking powder, and salt together. Whisk to combined evenly.
  4. In a mixing bowl, beat egg yolks until very fluffy and thick. (You'll wonder if they'll ever thicken up but just be patient.)
  5. Gradually beat in sugar and beat 2 minutes on high speed, stopping to scrape the bowl.
  6. Reduce speed to low and add vanilla, lemon, and cold water.
  7. Gradually add flour mixture while beating on low, scrape bowl.
  8. Beat only long enough to blend, about 2 minutes.
  9. Pour batter into prepared pan.
  10. Bake 50 to 60 minutes or until golden brown or when pick inserted in thickest portion of the cake comes out clean or with dry crumbs.
  11. Cool cake for 15 minutes before removing from the pan. You might have to loosen the sides with a knife, but it'll be fine. 
  12. Serve with some berries and whipped cream.

Shopping List (FYI, I cut this recipe by a third when I baked)
12 large egg yolks room temp
3 cups all-purpose flour
2 and ½ teaspoon baking powder
½ teaspoon salt
2 cups granulated sugar
1 teaspoon vanilla
1 1/2 teaspoon almond extract
1 cup cold water

miso chocolate chip cookies

4.24.2020

My new favorite thing is freezing cookie dough. In the last couple years, I've grown a little bit more of a sweet tooth... and the concept of having ready made frozen cookie dough is a very alluring concept. The first time that I did this was with the gluten free chocolate chip cookies.

I was scrolling away on Instagram and saw these miso chocolate chip cookies from A Cozy Kitchen. One, I loved them because they looked warm and chewy. Two, I loved them because they used up the rest of the miso in my fridge. Apparently miso has no real expiration date? I googled it last year. Thankfully when Google told me that miso didn't expire as fast as bananas, I got to take a break from putting miso in everything.

These chocolate chip cookies come together rather like many other varieties - just with a bonus dash of miso paste. Why miso paste? It is hard to describe the flavor profile that it adds. It's like asking me to describe what matcha tastes like :-) But, I've read it described as "savory and deep" which seems accurate. One thing? I needed to add a full stick of butter to my dough as opposed to just 5 tablespoons. The dough just was not coming together without that. Another thing? I only had red miso paste and semi-sweet chocolate chips on hand.... cookies are still delicious.
  1. Add the unsalted butter, miso, sugars and vanilla extract to the bowl. Beat the ingredients together until light and fluffy, about 3 minutes.
  2. Crack in the egg and beat just until it’s combined. Add the flour, baking powder, and baking soda. Mix until well combined. and mix once more just until you no flour speckles appear. Add the chopped chocolate and mix one last time.
  3. You can either use a large cookie scoop (that holds 3 tablespoons of cookie dough) or a medium cookie scoop (that holds 1 1/2 tablespoons cookie dough).
  4. Scoop out balls of cookie dough onto a baking sheet and transfer to the fridge to chill for 1 hour. 
  5. Preheat oven to 350. Bake cookies on parchment paper for about 10-14 minutes. Cookies will be done when the edges are lightly golden brown. 
  6. Sprinkle with sea salt for maximum enjoyment
Shopping List
1 3/4 cups all-purpose flour
3/4 teaspoon baking powder
1/2 teaspoon baking soda
8 tablespoons unsalted butter, at room temperature
2 tablespoons miso paste
1/2 cup brown sugar
1/2 cup granulated sugar
1/2 teaspoon pure vanilla extract
1 large egg
1 cup chocolate chips

gluten free chocolate chip cookies

4.14.2020


In the last couple years, I've become more of a dessert person - but not just any dessert. I'm still not choosing a piece of pie after my dinner but I'll rarely push away a piece of chocolate or cookie.

Given my lack of self-control, I have removed all of the Reese cups from my house for the last couple months. The seasonal shapes are my weak spot for sure.

With the recent shift to a quarantined lifestyle, I have been doing a fair amount of baking. A friend of mine dropped off some of the most amazing chocolate chip cookies of my life. These are not that :-) but they are still quite great and gluten free. So, if you are like myself and accidentally bought gluten free flour from Whole Foods delivery.... you can also make these cookies tonight. 

When I made these, I did freeze nearly 75% of the dough for another night. This worked quite swimmingly. I just put a ice cream scoops of cookie dough on a sheet and set them in the freezer to harden a bit before transferring to a plastic bag for storage.

Next time? I feel like this is a great base and you could easily add in other fun stuff like nuts, reese chips, heath chips... or whatever the spirit moves you to do. 
  1. In a medium bowl, whisk together the gluten-free flour, almond flour, baking soda and salt until evenly combined. Set aside.
  2. Melt butter in a saucepan over medium heat. Once the butter is melted start to whisk constantly. First the butter will begin to foam, then after a couple of minutes it will begin to brown on the bottom of the saucepan. Turn off the heat as soon as the solids turn brown and the butter gives off a nutty aroma. Pour into a glass mixing bowl to prevent burning.
  3. Add the milk, brown sugar and white sugar. Whisk to combine. Add the egg and vanilla and whisk until smooth and creamy.
  4. Using a rubber spatula, mix in the dry ingredients until well combined. Stir in the chocolate chips.
  5. Cover the bowl and let sit for 30 minutes. Preheat the oven to 350F. Scoop the cookie dough (about 2 Tablespoons of dough per cookie) and place a few inches apart on the baking sheets. Bake for 10-12 minutes, until golden and the center is set.
  6. Let cool 5 minutes then transfer to a wire rack to continue cooling. Enjoy!
Shopping List
1/2 cup butter
1 tablespoon milk (regular or almond is fine)
3/4 cup brown sugar
1/4 cup white sugar
1 egg
2 teaspoons vanilla
1 1/3 cups gluten-free all-purpose flour 
1/4 cup almond flour
1 teaspoon baking soda
1/2 teaspoon salt
1 cup chocolate chips
Sea salt for sprinkling

very easy tuna cakes

4.08.2020

How many posts in a row can I reference quarantine cooking? The answer is probably a lot - and probably more for the next two months or so.

As we prepared to eat more out of our houses and with less trips to the grocery store, I impulse bought a couple cans of tuna fish one day at the local grocery store. It had probably been at least three years and maybe five since I last bought a can of tuna fish. Since then, I have probably crushed a can of tuna each week either in the form of a tuna melt... or these very tasty tuna cakes.

I actually got the idea for these from watching an episode of British Home Chef on Hulu. The essential idea of the show is XYZ. In one of the final episodes of season 2, the "rustle up challenge" was to create a meal based on a can of tuna fish. Nearly everyone failed but thankfully the hosts commentary gave good ideas ... and tuna cakes was one of them.

Tuna cakes will come together in probably 15 minutes max - including all prep and cooking. It's a simple case of opening a can of tuna, mixing some stuff into it, making little patties and then eating them. My preferred method was over some chopped romaine with a lemon champagne vinaigrette - but I did also mix one into some pasta with red sauce. Like I said, I've eaten these almost weekly recently. 

Here's my favorite way to eat them. 
  1. make tuna cakes
  2. cut up your preferred greens. I have been opted for romaine recently. It lasts a really long time in the fridge.
  3. Plate tuna cakes on top of the greens. Sprinkle with cheese of choice (feta, goat cheese, etc).
  4. Drizzle a combo of champagne vinegar, olive oil, smidge of honey, and kosher salt.

How to make tuna cakes? It's very easy. 
  1. mix all the ingredients in a bowl except the bread crumbs.
  2. Add the bread crumbs in small increments until you get the mixture to the right consistency. you want to be able to form a ball. But not too many breadcrumbs because then you won't taste all the other good stuff you added.
  3. heat a skillet to medium high with a drizzle of olive oil. gently press your patty into the pan. 
  4. cook for maybe 2-3 minutes on each side. adjust the heat as needed. remember you don't need to cook any of these ingredients, so you are just heating them to get color on the patties and secure the shape.
  5. All done!
Shopping List
1 can of tuna fish
2 tbsp of mayo
1 egg
1/4 cup diced onion
salt and pepper to taste
1/4 to 1/2 cup bread crumbs (or panko flakes)

bonus ingredients?
capers
red onion
chopped parsley

sourdough pancakes

4.05.2020

I've been making pancakes on Sunday evenings for probably 2 months now... or perhaps more honestly.
Sometimes figuring out what to eat for dinner every night can be a lot, so knowing that Sunday is for pancakes makes life a bit easier. Plus it normally means bacon is also on the menu. 

Given that I recently adopted a sourdough starter, I've been looking for ways to use it that aren't bread. I love the bread, it's delicious. But it's also addicting. One slice always leads to three slices. 

A quick google search lead to a sourdough pancake recipe from Tastes of Lizzy that used all my extra sourdough starter. I tweaked the recipe a bit to be a little sweeter and saltier - my favorite things. I have never seen such fluffy tall pancakes in all my life. They are perfect for your favorite mix-ins: chocolate chips, blueberries, sprinkles... whatever makes you happy.

Here's how it goes.
  1. In a large bowl, whisk together the flour, baking powder and soda, sugar and salt.
  2. Add the sourdough starter, milk, egg and butter. Mix well just until combined.
  3. Make pancakes like normal!
Ingredients
2 cups all-purpose flour
4 teaspoons baking powder
1 teaspoon baking soda
3.5 tablespoons granulated sugar
1 teaspoon salt
1 cup sourdough starter
1 1/2 cups milk
1 large egg beaten
2 tablespoons melted butter

buttermilk cinnamon peanut butter donuts


Yes, that is a really loaded name for these small donuts... but it is all the truth.

Donuts were not on my list of things to make during this quarantine but I had some fresh buttermilk... and I'm trying very hard to reduce my waste.

Why the fresh buttermilk? Well, I obviously had to make fresh butter because the store was out of butter and toast without butter is lunacy. Last week I made my mom a batch of butter and split it between three flavors: cinnamon sugar, salted honey, garlic thyme. She has not complained about any of them.

The original call for this recipe (from Nourished Endeavors) was just a simple dip in cinnamon sugar. That was nice. It tasted fine - but then I had a flash of brilliance to do a simple glaze of peanut butter... and then sprinkle cinnamon sugar on top. HOME RUN. The creamy peanut butter gives the otherwise cake donut a silkiness and amps up the heavenly level. I'm really pleased with it. 

For the peanut butter topping, here are some special notes:
  • This is all about you and what you prefer. You can't mess up peanut butter and the donuts are already cooked :-)
  • Start with the melted butter and add the peanut butter to it. Just a tablespoon at a time. Mix it up. Work up to the consistency that you like. I went with just a little more loose than normal peanut butter.
  • Give it a little taste. Do you like it sweeter? Add a tiny bit of powdered sugar (1 tsp) to sweeten it up.
  • If the mixture gets too firm for you, just add a DROP or two of liquid. Yes, I meant to use the capitals. You will only need a very little bit.

Here's how it goes.
  1. Preheat oven to 325F. Generously grease a standard donut pan.
  2. In a medium mixing bowl, add and whisk together the egg, brown sugar, buttermilk, melted butter and vanilla extract.
  3. In a separate mixing bowl, add the flour, salt, cinnamon, nutmeg, baking powder and soda into a medium mixing bowl. Whisk to combine and then fold into the wet bowl. Take care not to over mix batter. (Honestly, I used only one bowl... I just put everything in one and it came out fine... but if you are a perfectionist... use two)
  4. Transfer donut batter into a large pastry bag or Ziplock bag, cut off about a 1/4” of the tip of bag and pipe batter into prepared donut pan.
  5. Bake donuts for 5-10 minutes. Donuts are ready when a toothpick inserted into one comes out clean. My mini donuts were done in 4-5 minutes and the bigger ones about 10.
  6. Allow donuts to rest in pan for 5 minutes before taking out of the pan.
For the coating and topping
  1. Place melted butter in a small dish. Set aside. 
  2. Add tablespoons of peanut butter one by one to the butter to get the consistency you like. See above for notes.
  3. In a separate small mixing bowl/container, add sugar and cinnamon and whisk to combine. 
  4. Just spread the peanut butter on the donut and then sprinkle with the sugar... done!
Shopping List
1 Cup Unbleached All-Purpose Flour
3/4 Teaspoon Baking Powder
1/2 Teaspoons Ground Cinnamon
1/4 Teaspoon Baking Soda
1/4 Teaspoon Ground Nutmeg
1/4 Teaspoon Sea Salt
1 Large Egg, Room Temperature
1/4 Cup + 2 Tablespoons Buttermilk, Room Temperature
1/4 Cup Brown Sugar, Light or Dark
2 Tablespoons Melted Butter
1/2 Teaspoon Vanilla Extract

Coating
1/2 Cup Granulated Sugar
1/2 Teaspoon Ground Cinnamon
2 Tablespoon Melted Butter
3 Tablespoon peanut butter
1 Tablespoon powdered sugar

grapefruit white chocolate macaron

2.25.2020


So, I am continuing to experiment with macarons... and this might have been my best batch to date. They were great for so many reasons. One, the flavoring was very solid. Two, the consistency and shell structures were real good.

What did I do differently? I finally bought a scale. I always thought using scales would be more work than I wanted to spend... but boy was I wrong. I love using a scale now. It is so easy and making cooking cleaner some how. For example, it was really clear to me that 120 grams of egg whites was significantly more than 3 eggs worth. It ended up being close to 4 eggs. The other difference was that I added a little bit of granulated sugar to the whipped egg whites. This is the website that I used as a guide. Although not a video, there are a lot of detailed pictures to show progress.

I made these babes for a Galentine's Day dinner with family ladies. They were rather perfect and it was hard to not keep eating them. I think the next time I make macarons, I might try for some itty bitty ones. Then I could eat 3 and not feel bad about it.
  1. Place the confectioners’ sugar and almond flour in a food processor or blender and pulse or blend for 30 seconds until thoroughly combined and fine in texture. Set aside.
  2. In a completely dry and grease-free bowl, beat the egg whites and salt together on medium speed for 1 minute. Switch to high speed and beat *just* until stiff peaks form, about 3 minutes. Do NOT overbeat. Using a metal spoon or rubber spatula, gently fold in the sifted granulated sugar, 1 Tablespoon at a time.
  3. On low speed, beat in any flavor or color at this point. Do not overmix.
  4. Fold in the confectioners’ sugar/almond flour mixture until combined. Be very gentle and light-handed while doing so. Once completely combined, the mixture will be smooth, sticky, and glossy.
  5. Let the batter sit uncovered at room temperature for 10-30 minutes. Meanwhile, fit your piping bag with the piping tip. Line 2-3 baking sheets with silicone baking mats.
  6. Fill the piping bag with the batter and pipe evenly sized rounds onto the baking sheets. Gently tap the bottom of the baking sheets on your counter to rid any large air bubbles. You can lightly sprinkle a few sprinkles or any edible decorations onto the wet round shells at this point.
  7. Let the piped rounds sit for at least 45 minutes and up to 1 hour. This is crucial to making macarons! The air will will help the rounds set and form a dry shell. They should not be sticky going into the oven.
  8. Preheat oven to 325°F (163°C). Bake the macarons for 10 minutes, one baking sheet at a time. Rotate the pan at the 5 minute mark. The tops should be crisp and the macarons should have formed their signature crinkly “feet.” Allow to cool completely on the baking sheet before filling.
  9. Fill with buttercream and sandwich two shells together!
Shopping List
200g confectioners’ sugar (close to 2 cups)
100g almond flour (close to 1 cup)
120g room temperature egg whites (around 3 large egg whites)*
1/8 teaspoon salt
40g sifted granulated sugar or caster sugar (3 Tablespoons)
flavoring or color* --> I used like 1 tbsp of grated grapefruit zest
your desired filling* --> I used a standard buttercream but flavored with coconut extract and grapefruit zest

bagel egg bake

2.09.2020

Let me introduce you to a very easy and impressive brunch recipe. I honestly have no idea what to call it - but perhaps a "bagel egg bake"? 

I've attempted several different brunch casseroles over the years and this is one of the best. It is also one of the easiest. There are only 6 ingredients! I ended up making a slightly larger batch than the recipe called for... which necessitated in getting some emergency eggs from my neighbor.

This made for a great accompaniment to the brunch. It was not too eggy and the green onions made a great addition. I also made a blood orange cardamom cake to go with it... and some other nice ladies brought a fruit salad and tasty pink donuts. The best and worst part about hosting brunch is that I'll be eating all these leftovers for two more days. 

A few notes:
  • prepare the dig the night before for ultimate ease
  • I bought fresh bagels from Trader Joes... but this would be a great opportunity to get a bargain on some day old bagels
  • i swapped out regular bacon for turkey bacon... frankly, I didn't even notice the difference and I love bacon. You could also swap in pancetta or anything salty.
  1. Arrange bagels in 2- to 2 1/2-qt. baking dish. 
  2. In large bowl, whisk together eggs, milk, cheese, bacon, 4 sliced green onions, 1/2 teaspoon salt and 1/4 teaspoon pepper. 
  3. Pour over bagels, pressing down slightly to submerge. 
  4. Cover and refrigerate 1 hour or up to overnight. 
  5. Preheat oven to 350 degrees F. Uncover dish and bake 45 to 55 minutes until set. 
  6. Let cool 15 minutes before serving; garnish with green onion.
Shopping list
4 "everything" bagels, toasted and chopped 
6 large eggs 
2 c. milk 
4 oz. Monterey Jack cheese, shredded 
4 slices cooked turkey bacon
4 green onions, sliced, plus more for garnish

blood orange cardamom cake

Hello there beautiful. That is what you can say to this cake once you flip it out of the pan. 

I was looking for something a little bit red and a little bit fun to make for a galentine's brunch this weekend. It was incredibly easy to make and a bit of a shocker to me honestly. I am probably now going to see what other fruits I can put in cake pans and flip upside down.

A few takeaways:
  • amount of fruit? I saw some versions of this cake with a ton of overlapping oranges... and then a lot less. I think somewhere around my amount was correct. Perhaps a little bit more so you are guaranteed some in each slice
  • crazy moist? I accidentally left this cake out on the counter overnight... and you'd never know.
  • rind on the fruit? I left mine on because I liked how it looked on a baked cake. The rind completely bakes down and is very easy to cut through. The internet says that sometimes it could be a bit bitter, but I didn't notice.
  • the original recipe from "The Broken Bread" had the steps in a slightly different order... but I rearranged them to make a little more sense. 

Here's how it goes.
  1. Preheat oven to 350°F. Lightly grease the edges of a 9″ spring form pan with nonstick spray or butter.
  2. In a large bowl, whisk flour, sugar, cardamom, baking powder, and salt together until combined.
  3. In another bowl, whisk eggs, ricotta, vanilla, and orange juice until smooth. Once combined fold the ricotta mixture into the dry ingredients with a spatula until just blended. Then, gently fold in melted butter.
  4. Place 3 tablespoons butter and brown sugar in a small saucepan and cook on low heat just until the butter melts. Whisk the mixture a few times until smooth and pour into the cake pan, making sure that it evenly coats the bottom; set aside.
  5. Place orange slices on the bottom of the cake pan, arranging the slices to fit. Carefully pour in the cake batter over the top of the oranges and place in the oven and bake for 45-55 minutes, or until a toothpick inserted into the center of the cake comes out clean. 
  6. Allow the cake to cool for 15-20 minutes before removing from the pan. Invert the cake onto a plate and serve once completely cooled.
Shopping List (original recipe)
1 1/2 Cup (180g) All-Purpose Flour
1 Cup (200g) Evaporated Cane Sugar
1 1/4 Teaspoon Cardamom
2 Teaspoons Baking Powder
3 Large Eggs
1 1/2 Cup Ricotta Cheese
1Teaspoon Vanilla Extract
2 Tablespoons Fresh Orange Juice
1 Stick Butter, melted

my 2019 christmas card

1.18.2020

2019 was quite the year. It some ways it was a dumpster fire and in other ways it was wonderful. Obviously the dumpster fire didn't make the actual Christmas card photo :-) But overall, it was a year that was spent mostly outside, wearing leggings, or looking for Lowe's coupons online. 

I did come to the realization that I get 1 Christmas for every 2 that I send out. For someone who is often most interested in efficiency,  you might think that I'm going to make some cuts in 2020.... but honestly that is unlikely. I love sending them out and frankly at the cost per card including postage... I'll take the $25ish hit. 

If 2018 was the year of renovation... and 2019 was the year of embracing my neighborhood and the outdoors.... I'm on the edge of my seat for what 2020 will bring. I have a lot of personal projects this year that aren't small, so it'll be interesting to see what materializes over the next 12 months. 

Prior years: 2018, 2017, 2016, 2015

Chocolate dipped merengues

1.16.2020


I am fully committed to merengues as a household staple. I believe that I have now made them weekly for a month? The minute I eat the last one in the container.... I just start to whip up some egg whites for a fresh batch.

The recipe isn't wholly different from the peppermint merengues that I made over Christmas... the difference is that I discovered the magic of dipping them in chocolate. I didn't stop there either. I started to then dip them in nuts and shredded chocolate. And then just this past weekend, I mixed some peanut butter into the chocolate and that was delightful too.

Here are the iterations I've done:
(1) regular peppermint merengue
(2) coconut merengue dipped in chocolate
(3) coconut merengue double dipped in chocolate and then sea salt pistachio or shredded coconut
(4) almond extract flavored merengue dipped in chocolate peanut butter
(5) vanilla extract flavored merengue dipped in sea salt pistachio

And if I'm being honest, I've got my eye on some orange extract that I feel like would be a great decision too.
Here's how it goes.
  1. Preheat oven to 200 degrees F. Line 2 baking sheets with parchment paper, set aside.
  2. In a large bowl beat the egg whites, cream of tartar, peppermint, and salt with a mixer on medium until soft peaks form. Gradually add the sugar, 1 tablespoon at a time beating on high. Beat well after each addition. Beat until stiff peaks form.
  3. Place a pastry bag fitted with a large star tip inside a large cup and fold excess over top of the cup. This will help hold the pastry bag in place making it easier to paint the stripes and fill with meringue. If desired, using a small paintbrush paint small stripes up the sides of the pastry bag. Carefully spoon the meringue into the bag. Pipe evenly sized merengues onto prepared baking sheet about 1" apart. I went with 2 and 4 inch merengues.
  4. Bake for 1 1/2 hours or until meringues appear dry and firm when lightly touched. Remove and cool on a wire rack.
  5. Dip in melted chocolate and then dip again in a mixture of pistachios and sea salt.
Shopping List
3 large egg whites
1/4 teaspoon cream of tartar
1/4 teaspoon pure extract
3/4 cup granulated sugar
chocolate chips
coconut oil
pistachios, very finely chopped
sea salt

Nighttime Moon Milk

1.08.2020

I believe I first saw this recipe on Instagram back in the Fall. I was immediately enchanted by the idea of "moon milk" and had to know more. After reading the Bon Appetit description, I was sold. I love sleep and this promises more sleep.

While I had all the spices at my disposal, it did take me a little bit to get the last ingredient: ashwagandha. Whole Foods does sell several different options but I held off for a sale to save a few extra dollars. The recipe calls for ashwagandha powder but you can also just open one supplement pill like I did. Turns out one pill is exactly the amount called for in this recipe.

I have now made this 3 times and enjoyed it more each night. The first night that I drank this milk before bed I slept over nine hours. 

1st batch = made it a little too hot and wasn't patient enough to let it cool
2nd batch = perfect temperature
3rd batch = good temperature again... and I actually strained the hot milk to remove some of the excess spices before drinking it. 

I am quite sure that I got less benefit from the strained milk but I did enjoy drinking it a whole lot more. To each their own, but seriously... try this milk if you love sleep.
  1. Bring milk to a simmer in a small saucepan over medium-low heat. 
  2. Whisk in cinnamon, turmeric, ashwagandha, cardamom, ginger, if using, and nutmeg; season with pepper. 
  3. Whisk vigorously to incorporate any clumps. 
  4. Add coconut oil, reduce heat to low, and continue to cook until warmed through, 5–10 minutes (the longer you go, the stronger the medicine). 
  5. Remove from heat and let cool slightly. Stir in honey (you want to avoid cooking honey or you'll destroy its healing goodness). 
  6. Pour into a mug, drink warm, and climb right into bed.
Shopping List
1 cup milk (any variety... regular, nut, etc)
½ teaspoon ground cinnamon
½ teaspoon ground turmeric
¼ teaspoon ground ashwagandha
2 pinches of ground cardamom
Pinch of ground ginger
Pinch of ground nutmeg
Freshly ground black pepper
1 teaspoon virgin coconut oil
1 teaspoon honey

tomato recap 2019

1.05.2020

Funny story. I wrote nearly this entire recap post in September... and it has taken me this long to finish it. I'm getting ready to think about this year's garden plans. I've got about 15 tabs open in my browser and they are all different tomato varieties.

The tomatoes were pretty solid this year. Solid enough that I've unfortunately let way too many rot and then pulled myself together enough to can more than the amount that spoiled. 

Overall, feel pretty good about this year's selection. I'm not sure that I love them as much as the 2018 batch but a strong showing none the less. There was always something to make a good salad with and that is half the battle. 


TypeOverallUniqueProduction
Pink BerkeleyBeefsteakCAD
Mr. StripeyBeefsteakB+BA-
Big RainbowBeefsteakBAC
Tasmanian ChocolateSlicerDCD
Fourth Of JulySlicerAAB+
TomatoberryCherryBCA
Red CurrantCherryAAA
Chocolate PearPearABA
Black TrufflePearB+AB+
BlushPlumB+AA
Tangerine MamaPlumBBA

BEEFSTEAK
PINK BERKELEY TIE DYE // I have nothing to say about this one - in part because it was the worst producer out of the whole bunch. But I did like the one tomato that I got.... yes ONE.

Mr. Stripey // Super productive plant. The size is a true beefsteak. I lost more to bugs than I'd like. I didn't do a great job trimming the plant back and as a result there was more space for the bugs to hide and snack.

Big Rainbow (2018) // This variety was far more successful this year than in 2018. I believe I only got 1 good tomato last year... and this year I'm shaping up for at least more than that. It is the absolute most beautiful slicer. The colors are incredible.

SLICER
Tasmanian Chocolate // Overall a disappointment. Nothing special to write home about. I had one in my first tomato salad of the season and I can't remember anything about it. I might have picked it a tiny bit early. The colors on a ripe tomato are rather dull and muted so it is not even a pretty tomato to have in the garden. Can't recommend this to anyone.

Fourth Of July (2018 graduate) // all-star tomato. I'll forever put this in my garden. Despite being one of the first varieties to ripen, it has wonderful flavor. The size is perfect and it works great as a small slicer.

CHERRY
Tomatoberry // beautiful bright red cherry sized tomatoes. They ripen on strands like other cherry varieties. The fruit is also quite strong and resists bursting or damage when it falls from the plant.

Red Currant // Okay, the red currant is filed under: want to do again for sure but need to figure out how to manage it. The little fruits are the absolute best. Anyone who has tried one in the garden agrees, but it just is a bit sprawler of a plant. I don't think caging it is the answer either. Like maybe this is one of those plants that you hang upside down? I'm going to really have to think about this one - but anyone with kids or grandkids should plant this variety. It is amazing.

PEAR
Chocolate Pear // Sweet lord this plant was productive. The flavors are great for such a small fruit. Would absolutely recommend.

Black Truffle (2016, 2017, 2018) // I didn't love the black truffle this year as much as in prior years. I do believe this is an all-star variety for most, I just might be tiring of it. The fruit was just as productive as in prior years but ripened a bit differently. It was as though the whole tomato was never fully ripe. Maybe that doesn't make sense but it feels like the most accurate description. 

PLUM
Blush // The blush was the first tomato to ripen this year! I won't plant this one again but it was an all-star and has contributed to many many jars of homemade sauce. The fruit stays in good shape for quite some time. I used it often in salads as well. It's a perfectly fine tomato, just not worthy of a repeat showing in my garden.

Tangerine Mama // I primarily used these in my canning sauce. They didn't have that soft, ripe texture that you generally want in some tomatoes. I feel like they would be great as a slow roasted tomato because of the size and shape. This might sound obvious, but wait until the color is a deeper tangerine. The deeper the color the better the flavor. 

So what makes the cut for next year's garden? Hard to say. I love growing so many different varieties of tomatoes. It is really fun for me - but it might be too many tomatoes to reasonably care for. Instead of planting 12, I might try to scale back to 8. That seems very reasonable.

Posterity Posts: Garden Plans (20182017, and 2016) + Recap (20182016)


© WHAT JEN DOES • Theme by Maira G.