brown butter miso mac and cheese

2.22.2019

One of my intentions of 2019 is to waste less food... so what does that mean for right now? I'm putting miso in just about everything. I purchased the miso for the miso banana bread and now I'm intending to use every last drop of it.

I had all the ingredients for this dish for nearly a week but just never quite got the drive to make it. I had the same feeling the last time I made mac and cheese from scratch. It feels like a lot. Make the pasta. Make the roux. Melt the cheese. But it is not. It's very easy. I was eating incredible homemade mac and cheese before I knew it.

Candidly, I skipped the whole crunchy panko topping step too. I was so hungry and once I tasted the cheese sauce there was no stopping me. That being said, this would be unstoppable if you could make it through to the end. Crunchy mac and cheese topping can cure everything.

A few things:
  • Pick your pasta // You might as well pick something that is fun - but also that grabs the cheese a bit. I was at Trader Joes and they had Gigli - which is hard to describe but a little extra special. Nothing the matter with rotini, macaroni, or rigatoni.... but it cost about 50 cents more and was 200% more fun.
  • Cheese // Original recipe suggests a blend of cheddar, Pecorino, and Gruyère. While I was at Trader Joe's over the weekend, they had a cheddar + gruyere blend on the shelf. I'm all about keeping things easy so I went for this one. Added bonus? It cut the recipe cost in half. Buying one cheese versus two.
  • Brown the butter // This was an unintended bonus. I hadn't planned for this but browned butter adds such a great flavor - especially when combined with the miso.
  1. Preheat oven to 375° F.
  2. Bring a large pot of heavily salted water to boil. Add your pasta and cook until a minute or two shy of al dente (do not cook it all the way to al dente!). Drain (don't rinse) and set aside.
  3. In a large pan, heat the butter until it melts. Add the flour and cook, whisking constantly to break up any clumps, for a minute or two.
  4. Whisk in the warm milk and bring the mixture to a boil, then reduce to a simmer and cook until the mixture thickens and coats the back of a spoon. This can happen very fast.
  5. Remove from the heat and stir in 2 cups of the cheese and miso paste.
  6. Add the cooked pasta to the cheese sauce and stir to coat.
  7. Pour the pasta into a greased baking dish and sprinkle the top with the remaining 1/4 cup cheese and the panko.
  8. Bake the pasta for about 25 minutes. The pasta should be bubbling and the breadcrumbs should be browned.
  9. Remove from the oven, let cool slightly, and serve.
Shopping List (serves 4 hungry people, 6 non-hungry people)
8 ounces dried pasta
3 tablespoons butter
3 tablespoons flour
2 cups milk, warmed slightly
2 1/4 cups shredded cheese (I like a mix of cheddar, Pecorino, and Gruyère), divided
1/4 cup sweet white miso paste, or to taste
1/4 teaspoon kosher salt
Freshly ground pepper
1 cup panko breadcrumbs

miso banana bread

2.21.2019

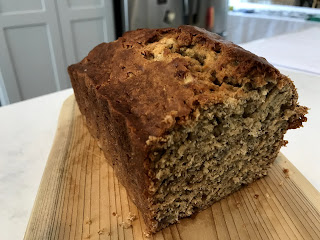
I'm not really a banana person but I do love banana bread. It's like a sneaky, potentially healthy breakfast dessert. I saw a reference a couple weeks ago to miso banana bread. A miso banana bread feels like a lifetime of difference from the other variations like: nutella, peanut butter, chocolate, or just straight up banana bread.

I've only bought miso paste one other time in my life and it turns out I never wrote up the recipe. I think it was something like a miso carrot soup if my memory serves me. I know very little about buying miso paste except that there are different colors. The original recipe called for white paste, but Whole Foods was out of that... so red paste it is. For what it's worth here are the differences according to kitchn.com:
  • White Miso: This miso is made from soybeans that have been fermented with a large percentage of rice. The miso has a definite sweet taste. It’s best used in condiments like mayo or salad dressings, or in light sauces.
  • Red Miso: This is also typically made from soybeans fermented with barley or other grains, though with a higher percentage of soybeans and/or a longer fermentation period. The deep umami flavor of red miso can overwhelm mild dishes, but is perfect for hearty soups, braises, and glazes.
Based on that, hindsight might have been to wait for white miso paste to be available.... but too late because I already baked the bread. It is so different - and great. It is hard to describe the difference in flavor but it is rich and the opposite of a sugary quick bread.

As of now I've made this recipe twice. First time? The original recipe called for just one big loaf - which I did.  It requires such a long cooking time that the top gets a little bit more toasted than I'd like. Candidly, I found a few spots in the bread that could have been cooked longer too. Second time? Split the batch into two smaller pans. Total win. The cooking time is about half (50 mins or so) and completely cooked through.
  1. Preheat the oven to 350°. Butter and flour a 10-by-5-inch metal loaf pan. In a bowl, using 
a fork, mash 4 of the bananas until chunky. In another bowl, whisk the flour, baking soda, baking powder and salt.
  2. Using a stand mixer fitted with the paddle, cream the butter, sugar and miso at medium speed until fluffy, about 5 minutes. At low speed, slowly add the buttermilk, then beat in 
the eggs 1 at a time until incorporated. Beat in the mashed bananas; the batter will look curdled. Add the dry ingredients and mix until just blended. Scrape into the prepared pan.
  3. Bake for 
90 minutes, or until a toothpick inserted in the center comes out clean. Let the bread cool on a rack for 30 minutes before turning out to cool completely.
Shopping List
4 medium overripe bananas
1 3/4 cups all-purpose flour
1 teaspoon baking soda
1/2 teaspoon baking powder
1/4 teaspoon kosher salt
1 stick unsalted butter, softened
1 cup sugar
1/4 cup white miso
1/2 cup buttermilk
2 large eggs

chorizo and potato stew

2.10.2019

I'm always in the market for a new soup that doesn't feel like something I've made before. Soup is incredibly versatile... but sometimes it does feel like all the recipes are the same. Well, this one is different. Very different.

I came across this recipe from Bon Appetit in early January but finally got around to making it. What took so long you ask? Buying chorizo. I was attracted to this soup because it just seemed hearty and flavorful and totally different. It is absolutely all of those things - and more. 

I absolutely love it when I've just finished making something... go to take a taste of it... and and subsequently knocked off my socks. Is that an expression? But when I put the spoon in the broth, I was blown away by the rich, salty flavor. It made immediate sense why the original recipe suggested including sour cream. It's a phenomenal neutralizer and refreshing.

Let it be known that the two keys to this recipe are: (1) chorizo and (2) paprika. 
  • I first used chorizo in a soup back in 2012 by accident. It was a very happy accident and what really drew me to this recipe initially. Finding chorizo was not super challenging but it was more expensive than I wanted to pay. So much so that I half'd the recipe just to cut down on costs. I am just one person, so it's fine. But yes, you absolutely need chorizo for this. No substitutes.
  • Paprika. I've only ever used paprika in small amounts. Recipes normally call for a "pinch" of it but this recipe calls for 1/3 cup! Here are all the other times I've used paprika, just a friendly fyi.
  • Bonus? I crisped up the potato skins leftover from peeling the potato. It was a really wonderful touch and super easy. 

  1. Cook bacon in a large pot over medium heat, stirring occasionally. Remove from the pot when the bacon is beginning to brown but not yet crisp. Approx 5–7 minutes. Transfer to paper towels.
  2. Add onions to same pot and cook, stirring often, until golden and softened, 8–10 minutes. Then add garlic and cook, stirring, until softened, about 3 minutes. 
  3. Add tomato paste and cook, stirring, until slightly darkened in color, about 2 minutes. 
  4. Return bacon to pot and then add potatoes, chorizo, mushrooms, broth, paprika, and cayenne. Bring the pot to a boil and then turn the heat down to just a simmer. 
  5. Let the stew simmer for about 25 minutes or until the potatoes are tender. Soup is done when potatoes are tender.
  6. Divide stew among bowls and top with sour cream, dill, and a few grinds of pepper.
Shopping List
6 bacon slices, chopped
2 medium sweet onions, finely sliced
8 garlic cloves, thinly sliced
3 Tbsp. tomato paste
2½ lb. russet potatoes, peeled, cut into ¾" pieces
2 lb. smoked Spanish chorizo, cut into rounds, halved into half-moons
1 lb. button mushrooms, cut into ½"-thick wedges
8 cups low-sodium chicken broth
⅓ cup hot smoked Spanish paprika
½ tsp. cayenne pepper
1 cup sour cream
2 cups torn dill

funfetti scones

It was my mom's birthday last week and that obviously necessitated a fresh batch of scones. As a family, we default to funfetti on a regular basis. It seemed only natural to make some funfetti scones.

Do you want to know the trick to funfetti? There is none. It's literally just sprinkles in whatever you were already making. A little disappointing right? But that does make it very accessible and easy for people to try. The only thing to take note of is that you don't want to stir too much after adding the sprinkles because it can sometimes make the color bleed. The point of funfetti is not to make tie dye cake, it's to see the funfetti.

I have two methods for making scones. Dairy free with coconut milk or frozen grated butter. I went with this vegan, dairy free scone version for a couple reasons. It is the fastest and the easiest. But, the frozen butter scones are absolutely the best. You can't beat the layers that result from the frozen butter and the folded dough. Next time, I'll try the funfetti scones that way.
  1. Whisk together sugar, flour, baking powder, and salt in a medium bowl. 
  2. Combine coconut milk and coconut extract; drizzle over flour mixture and fold in just once or twice - then add in the sprinkles. Combine all ingredients until flour is incorporated and a shaggy dough forms. 
  3. Divide dough in half and turn out on a lightly floured board. Use lightly floured hands to pat each half into a 6-inch circle. Cut each circle into 6 wedges and gently pull apart. Use a spatula to gently (again) place scones on the baking sheet.
  4. Chill baking sheet in the freezer for 20 minutes while preheating oven to 425°F. 
  5. Brush scones with coconut milk and bake for 16 minutes. Cook until tops are set, edges are beginning to turn golden.
  6. Let scones cool / rest for about 5 minutes before drizzling with glaze. For the glaze, whisk together powdered sugar and milk in a small bowl. Drizzle glaze over scones and sprinkle with sugar. 

Shopping List (based on this original recipe)
Scones 
1/2 cup sugar 
1 tsp lime zest 
3 cups flour 
1 Tbsp baking powder 
1 tsp salt 
1 can full fat coconut milk (1 1/2 cups)
1/8 tsp pure coconut extract 
1/2 cup sprinkles


Glaze 

1/2 cup powdered sugar, sifted 
2 Tbsp full fat coconut milk 
decorating sugar
© WHAT JEN DOES • Theme by Maira G.