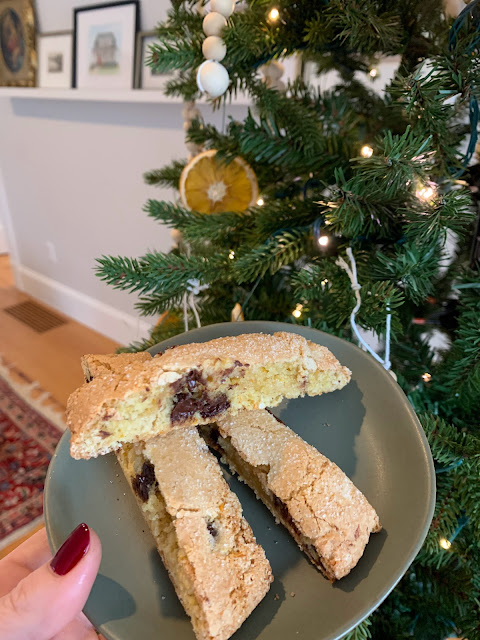
orange chocolate biscotti

12.14.2021


This is the 4th year that I've participated in the Salted Cookie swap. One of the benefits of the swap is that you end up with a pile of new recipes across all the participants.... but each year I'm still finding myself searching the internet for inspiration.

I had never made the biscotti before but had heard it was very easy. I also felt like it was going to be very shipping friendly. I do love the challenge of making macarons but have never felt comfortable shipping them. Macarons are left for local friends.

End result? Biscotti is very easy to make. You might be initially thrown by how dry the dough looks but have faith. It will work out.  

Previous swaps: salted brownie cookies (2020), peppermint meringues (2019), matcha green tea cookies (2018)


DIRECTIONS:

  1. Preheat the oven 375°F. Whisk the 4 eggs with the sugar until they become light and fluffy. Use an electric hand mixer or a stand mixer for better results.
  2. Add the zest of 3 oranges, honey, baking powder, dark chocolate chunks, and the flour and mix with a spoon until you get a sticky dough. Fair warning…. the dough is super heavy and might bend your whisk attachment. I recommend switching to the paddle option after you get it initially blended.
  3. Line your baking sheet with parchment or a silicone liner. Wet your hands and make 2 or 3 loaves 2-3 inches wide and about 1 inch thick for the whole length of your baking tray. Keep each loaf at least 3-4 inches away from each other.
  4. With wet hands or a wet spoon, smooth the top surfaces as much as possible, then sprinkle some sugar on top.
  5. Bake in the preheated oven for about 20 minutes or until golden on top.
  6. Let them cool for a few minutes than cut them into slices. Now place the Biscotti again on the baking tray with the cut side facing up and bake again for few more minutes to make them crunchy. If you want your Biscotti to be a little bit softer, you can skip the second bake.
  7. Let them cool completely before serving.

INGREDIENTS:

  • 5 1/2 cups All-Purpose Flour

  • 1 3/4 cups Sugar

  • 4 Eggs

  • 2/3 cup Dark chocolate, chunks or chips

  • 3 Oranges, zest

  • 2 1/2 tbsp Honey

  • 1 tbsp Baking Powder

miso peanut butter cookies

1.09.2021


File this under one of the best and easiest cookies on planet earth. The first time I made them I doubled the batch and was very happy that I did. I found the recipe on the New York Times Christmas cookie roundup. Of the 24 or so listed there were many that seemed very enticing.... but this is the only recipe I could get in front of the paywall.

The other benefit is I only needed one more ingredient in order to make them - miso paste. One quick Amazon Prime delivery later I was ready to make these cookies. 

I'll absolutely consider these to be my favorite peanut butter cookie on record. There is something extra special about the flavoring and they taste AMAZING fresh out of the oven. They are wonderfully, perfectly, heavenly soft and chewy. 
  1. In the bowl of an electric mixer fitted with the paddle attachment, mix butter, light brown sugar and granulated sugar at medium speed until light and fluffy, about 5 minutes.
  2. Add miso and peanut butter to the mixing bowl, and continue to mix at medium speed, about 1 minute. Scrape down sides of the bowl to make sure all of the ingredients are evenly incorporated, and mix a bit more if needed. Add egg and vanilla extract, and mix until just combined.
  3. In a medium bowl, combine flour, baking soda and baking powder, and whisk until incorporated. Add 1/3 of the flour mixture to the mixing bowl, and mix on low speed until flour mixture is incorporated. Repeat with remaining flour mixture in two batches until all of it is incorporated.
  4. Place 1/2 cup sugar into a small bowl. Working with one piece at a time, scoop out about 2 tablespoons of dough, and roll each portion between your hands until it is nice and round. (If the dough is too soft to roll, you can pop the mixing bowl in the refrigerator for 5 to 10 minutes to firm the dough up slightly.) Drop the piece of dough into the bowl of sugar and turn to coat. Transfer each ball to a parchment-lined baking sheet, arranging them about 3 inches apart. Repeat with all of the dough. I used a small cookie scoop and it was the perfect proportion.
  5. Refrigerate for 2 hours and up to overnight. This is important. It helps the flavors meld and what not.
  6. When ready to bake, heat oven to 350 degrees. Bake cookies for about 12-17 minutes total. When the edges are crisp and slightly puffed in the middle, pull out the baking sheet and hit it against a counter. This might be about 10 minutes or so. Bake for a couple more minutes and pull from the oven. Pull them out and again hit the baking sheet against the counter. The cookies should appear flat and crinkly at the center.
  7. Let the cookies cool on a baking sheet for a few minutes, then transfer to a cooling rack. Store fully cooled cookies in an airtight container; they should retain their chewy texture for a few days.
Shopping List
1 ¾ cups/225 grams all-purpose flour
¾ teaspoon baking soda
½ teaspoon baking powder
½ cup/115 grams unsalted butter (1 stick), at room temperature
1 cup/220 grams light brown sugar
½ cup/100 grams granulated sugar
⅓ cup/80 milliliters white miso paste
¼ cup/60 milliliters chunky peanut butter
1 large egg
1 ½ teaspoons vanilla extract
½ cup/105 grams sugar, plus more as needed

my christmas + new years card

1.03.2021

What a weird year. I had "Christmas Card" on my list for literally months. I normally start gathering pictures in early November, sent to the printer by Thanksgiving and cards in the mail shortly after that. I'm so eager to get them in the mail that I put regular stamps on the cards instead of postcard ones. 

This was a different year - not a bad one, just different.

My phone is filled with pictures but not of anything really. We essentially stayed home from March on and so there are no football games, trips to Maine, or random lunches out. But that didn't make it any less special of a year. 

After years of using Minted for my cards, I actually designed my own with Canva. I wasn't trying to be more affordable - but it certainly was :-). I love this years card. It feels very appropriate. Here are some quick thoughts on the pictures starting with the top left and moving clockwise.

  • Sunrise // I made it to less sunrises this year I think than in 2019. I think that is in part because I skipped all the ones with questionable weather. 
  • boat // Some really picturesque boat rides in the harbor this summer. "Thankfully" my brother lost his internship to covid, so he was around for nearly all of them. Half way through the summer we started a "boats and bagels" trend which was very productive. A morning cruise of the harbor with bagels and then the rest of the day to enjoy summer.
  • ginger on the beach // Ginger is very consistent. Her tail is always wagging. She always wants to be on the beach and she always wants to make friends with people. 
  • Kerrianne on the vineyard // In June, Kerrianne and I slipped away to the Vineyard for a couple days. It was one of the best moments of the entire year. We explored a trail that we had never been on despite having been to the Vineyard for nearly 30 years.
  • fresh air walk // this might have been the year that I spent the least amount of time on the trails. I'd like that to be better in 2021 but honestly any time spent getting fresh air is better than no time.
  • sunset stroll // a whole lot of time spent walking around my neighborhood. Depending on when I took my walks, I would often run into my dad in the morning or my mom in the afternoon. One of my favorite things was honestly just see them walking together and not even say hi. It felt like spying.
  • eleanor on the porch // year two of our beloved screen porch. I was working more this year so less time scrolling the internet with morning coffee, but still super peaceful and one of the best investments of 2019.
  • grandfather's birthday // who doesn't love a good cake? I can't remember what I made here. This is why I need to be better about writing down the recipes.
  • garden time // I spent probably more time in the garden this year than others, but absolutely no time writing about it. My flowers did really well this year. Less butterflies than in 2019 but I've got a plan to improve that for 2021. Goal is to get less bee stings however. I did not enjoy those.

vegetarian bolognese

1.01.2021


To be clear, I still love bacon and eat meat - but I'm trying to improve my diet. Normally I would have made a traditional bolognese like this one but was inspired to make a vegetarian version. And that is the reason why I bought tofu for the first time in my life. I figured that when I started to look for a vegetarian option I was going to get stuck with lentils, but that was not that case here. This recipe came from Camille Styles.

An expected win for this meal was that it is super affordable. The unexpected win was that it was INCREDIBLY delicious. I was beyond surprised at how flavorful and tasty this was without meat. I even made the jump to a vegan cheese - and that was good too. While it will be hard to get some people in my life to knowingly eat tofu, I think that I can trick them into it. 

I do think there are a couple things that you really must do to have success here. One is chop the veggies relatively small. Not mince them or anything like that - but small, especially the mushrooms. The second key is to actually let the mixture simmer for a full 45 minutes. I was surprised at how much the consistency changed. This recipe will absolutely be on a regular rotation in my house going forward.

  1. Drain the tofu between paper towels for 10 minutes, squeezing out as much excess water as possible. Crumble into small pieces and set aside.
  2. In a large dutch oven, warm the olive oil over medium-high heat, then add onion, garlic, carrots, celery, mushrooms, crumbled tofu, salt, pepper, and Italian seasoning. Stir everything together, and cook until vegetables are softened and tofu is turning golden/brown, about 20 minutes. (The mixture will start out looking way too wet, and by this point it should have mostly dried out and developed some caramelization, and tofu should be crumbly, not mushy.)
  3. Add tomatoes and sugar, then let simmer over medium-low heat, partially covered, for 45 minutes. Stir in butter.
  4. Cook pasta as directed and divide among bowls. Top with bolognese, parmesan, and basil. Season with salt and pepper, and eat!
2 tablespoons olive oil
1/2 package extra-firm tofu
1 onion, chopped
4 cloves garlic, minced
3 large carrots, chopped small
2 celery ribs, chopped
2 cups chopped mushrooms (chopped small, but not too fine)
2 teaspoons kosher salt
Freshly ground black pepper
1 teaspoon Italian seasoning
1 28-ounce can crushed tomatoes
1 teaspoon sugar
1 tablespoon butter
1 pound pasta
for topping: lots of freshly grated parmesan, basil leaves, salt and pepper

salted brownie cookies


It's really been a year without much blogging. I can't believe that it's been literally months since I documented something that I had cooked - and I don't like that. In part because some of these things have been really tasty! and it's so much easier to share a recipe that I've got on my own site.

These are the cookies that I made for my friend Becca's Christmas cookie swap. I wanted something that was a tiny bit different, not complicated, and would ship well. These cookies are absolutely all that and delicious too. They are best a day out of the oven but also still good a couple days later - just crispier and less fudgy. 

Prior year swaps? 2019 was peppermint meringues. 2018 was matcha green tea cookies.

  1. Preheat oven to 350°F and line two baking sheets with parchment paper. Whisk together flour, cocoa, baking powder, and salt in a medium bowl. Place chopped chocolate and butter in a double boiler or in a heat-proof bowl over a saucepan of gently simmering water. Slowly melt the chocolate, stirring occasionally until smooth. Remove from the heat and set aside to cool slightly.
  2. Combine eggs, sugars, and vanilla in a large mixer bowl fitted with a whisk attachment and whisk together on medium speed for 5 minutes. Reduce speed to low and beat in melted chocolate for 1 minute. Add flour mixture and mix on low speed for 20 seconds, just until combined. Fold in andes chips (dough will resemble a gooey brownie batter).
  3. Use a cookie scoop coated lightly with nonstick spray to form the cookies – invert the scoop just above the baking sheets, spacing cookies 3 inches apart.
  4. Bake, rotating pans halfway through, for 12 to 14 minutes, until tops are shiny and crackly. Remove from oven and sprinkle with flaky salt. Let cookies cool for 10 minutes on baking sheets, then transfer to a wire rack to cool completely.
Shopping List
2/3 cup (94 g) flour
2 Tbsp (12 g) unsweetened cocoa powder, sifted
1 tsp (4 g) baking powder
1/4 tsp (1.5 g) salt
8 ounces (226 g) semisweet chocolate, finely chopped 
1/4 cup (57 g) unsalted butter, cubed
2 large eggs (100 g), at room temperature
1/2 cup (100 g) sugar
1/2 cup (92 g) light brown sugar
1 tsp (4 g) vanilla extract
flaky salt, for topping
1 cup andes peppermint chips
© WHAT JEN DOES • Theme by Maira G.