Morning
Showing posts with label Morning. Show all posts

sourdough pancakes

4.05.2020

I've been making pancakes on Sunday evenings for probably 2 months now... or perhaps more honestly.
Sometimes figuring out what to eat for dinner every night can be a lot, so knowing that Sunday is for pancakes makes life a bit easier. Plus it normally means bacon is also on the menu. 

Given that I recently adopted a sourdough starter, I've been looking for ways to use it that aren't bread. I love the bread, it's delicious. But it's also addicting. One slice always leads to three slices. 

A quick google search lead to a sourdough pancake recipe from Tastes of Lizzy that used all my extra sourdough starter. I tweaked the recipe a bit to be a little sweeter and saltier - my favorite things. I have never seen such fluffy tall pancakes in all my life. They are perfect for your favorite mix-ins: chocolate chips, blueberries, sprinkles... whatever makes you happy.

Here's how it goes.
  1. In a large bowl, whisk together the flour, baking powder and soda, sugar and salt.
  2. Add the sourdough starter, milk, egg and butter. Mix well just until combined.
  3. Make pancakes like normal!
Ingredients
2 cups all-purpose flour
4 teaspoons baking powder
1 teaspoon baking soda
3.5 tablespoons granulated sugar
1 teaspoon salt
1 cup sourdough starter
1 1/2 cups milk
1 large egg beaten
2 tablespoons melted butter

buttermilk cinnamon peanut butter donuts


Yes, that is a really loaded name for these small donuts... but it is all the truth.

Donuts were not on my list of things to make during this quarantine but I had some fresh buttermilk... and I'm trying very hard to reduce my waste.

Why the fresh buttermilk? Well, I obviously had to make fresh butter because the store was out of butter and toast without butter is lunacy. Last week I made my mom a batch of butter and split it between three flavors: cinnamon sugar, salted honey, garlic thyme. She has not complained about any of them.

The original call for this recipe (from Nourished Endeavors) was just a simple dip in cinnamon sugar. That was nice. It tasted fine - but then I had a flash of brilliance to do a simple glaze of peanut butter... and then sprinkle cinnamon sugar on top. HOME RUN. The creamy peanut butter gives the otherwise cake donut a silkiness and amps up the heavenly level. I'm really pleased with it. 

For the peanut butter topping, here are some special notes:
  • This is all about you and what you prefer. You can't mess up peanut butter and the donuts are already cooked :-)
  • Start with the melted butter and add the peanut butter to it. Just a tablespoon at a time. Mix it up. Work up to the consistency that you like. I went with just a little more loose than normal peanut butter.
  • Give it a little taste. Do you like it sweeter? Add a tiny bit of powdered sugar (1 tsp) to sweeten it up.
  • If the mixture gets too firm for you, just add a DROP or two of liquid. Yes, I meant to use the capitals. You will only need a very little bit.

Here's how it goes.
  1. Preheat oven to 325F. Generously grease a standard donut pan.
  2. In a medium mixing bowl, add and whisk together the egg, brown sugar, buttermilk, melted butter and vanilla extract.
  3. In a separate mixing bowl, add the flour, salt, cinnamon, nutmeg, baking powder and soda into a medium mixing bowl. Whisk to combine and then fold into the wet bowl. Take care not to over mix batter. (Honestly, I used only one bowl... I just put everything in one and it came out fine... but if you are a perfectionist... use two)
  4. Transfer donut batter into a large pastry bag or Ziplock bag, cut off about a 1/4” of the tip of bag and pipe batter into prepared donut pan.
  5. Bake donuts for 5-10 minutes. Donuts are ready when a toothpick inserted into one comes out clean. My mini donuts were done in 4-5 minutes and the bigger ones about 10.
  6. Allow donuts to rest in pan for 5 minutes before taking out of the pan.
For the coating and topping
  1. Place melted butter in a small dish. Set aside. 
  2. Add tablespoons of peanut butter one by one to the butter to get the consistency you like. See above for notes.
  3. In a separate small mixing bowl/container, add sugar and cinnamon and whisk to combine. 
  4. Just spread the peanut butter on the donut and then sprinkle with the sugar... done!
Shopping List
1 Cup Unbleached All-Purpose Flour
3/4 Teaspoon Baking Powder
1/2 Teaspoons Ground Cinnamon
1/4 Teaspoon Baking Soda
1/4 Teaspoon Ground Nutmeg
1/4 Teaspoon Sea Salt
1 Large Egg, Room Temperature
1/4 Cup + 2 Tablespoons Buttermilk, Room Temperature
1/4 Cup Brown Sugar, Light or Dark
2 Tablespoons Melted Butter
1/2 Teaspoon Vanilla Extract

Coating
1/2 Cup Granulated Sugar
1/2 Teaspoon Ground Cinnamon
2 Tablespoon Melted Butter
3 Tablespoon peanut butter
1 Tablespoon powdered sugar

bagel egg bake

2.09.2020

Let me introduce you to a very easy and impressive brunch recipe. I honestly have no idea what to call it - but perhaps a "bagel egg bake"? 

I've attempted several different brunch casseroles over the years and this is one of the best. It is also one of the easiest. There are only 6 ingredients! I ended up making a slightly larger batch than the recipe called for... which necessitated in getting some emergency eggs from my neighbor.

This made for a great accompaniment to the brunch. It was not too eggy and the green onions made a great addition. I also made a blood orange cardamom cake to go with it... and some other nice ladies brought a fruit salad and tasty pink donuts. The best and worst part about hosting brunch is that I'll be eating all these leftovers for two more days. 

A few notes:
  • prepare the dig the night before for ultimate ease
  • I bought fresh bagels from Trader Joes... but this would be a great opportunity to get a bargain on some day old bagels
  • i swapped out regular bacon for turkey bacon... frankly, I didn't even notice the difference and I love bacon. You could also swap in pancetta or anything salty.
  1. Arrange bagels in 2- to 2 1/2-qt. baking dish. 
  2. In large bowl, whisk together eggs, milk, cheese, bacon, 4 sliced green onions, 1/2 teaspoon salt and 1/4 teaspoon pepper. 
  3. Pour over bagels, pressing down slightly to submerge. 
  4. Cover and refrigerate 1 hour or up to overnight. 
  5. Preheat oven to 350 degrees F. Uncover dish and bake 45 to 55 minutes until set. 
  6. Let cool 15 minutes before serving; garnish with green onion.
Shopping list
4 "everything" bagels, toasted and chopped 
6 large eggs 
2 c. milk 
4 oz. Monterey Jack cheese, shredded 
4 slices cooked turkey bacon
4 green onions, sliced, plus more for garnish

best quiche ever

10.01.2019

A couple weeks back I had the best quiche ever. It made me realize how lazy and terrible my quiches had been to date. I just would mix eggs and milk and call it a day. BUT, this new quiche was so perfect. I legit could not stop talking about it at the brunch.

I came home with the motivation to drastically improve my quiche. I knew right away that the answer would not be low calorie. I was adding way too much egg and needed to swap that with some heavy cream. I did some quick googling and came upon a recipe literally titled "Best Quiche Recipe". My suspicions were true.... more heavy cream and whole milk.

This recipe did help me realize two things. One? I'm not sure where my pie plate is. Two? I forgot that I threw out my pastry brush last Spring.

What did I learn this time?

  • Springform pan // Wonderful swap. I love how deep it makes the quiche and the overall structure. It does however essentially double the cooking time.
  • I never use pie weights // Not once in my life have I par baked a pie crust to the specifications in a recipe. I've lived to tell the tale but I do wonder how much better my crusts would be if I did this.
  • Custard // This is crucial. I am not sure what the difference is between "eggs + milk" and "custard" but there is absolutely a difference. So follow the recipe and you'll get a wonderfully creamy custard that does not taste "eggy".
  • Egg white seal // This seems real important. I feel like it helped to maintain the structure of the quiche and prevent leaks from happening.
  • Store-bought crust // Sometimes I like to make my own crust and then sometimes it is just easier to buy it. This isn't the worst thing in the world, it is just the easiest.

 
Here's how it goes.
  1. Pan Prep // Unroll your pre-made crust. Use your fingers to press and even out the crust into the pan. Ensure the bottom corners are tightly pressed against the pan. Stick in the freezer for at least 15 minutes or up to 2 days.
  2. Par-bake the crust // Heat the oven to 400 degrees. Line the frozen crust with a square of parchment, fill with dried beans (or another pie weight), then set on a sheet pan. Bake on the lower rack for about 40 minutes, rotating halfway through, until the crust is starting to brown along the edges and the bottom no longer looks raw and doughy. 
  3. While the crust is baking, use a fork to whisk the egg white with a pinch of salt until it’s very loose. When the crust is done, remove the parchment and beans and prick the bottom and sides of the crust a few times with a fork. Brush the inside of the crust with the salted egg white, then return to the oven to bake for another minute to set.
  4. Remove the par-baked crust from the oven to cool, then lower the oven to 325°F and turn your attention to the custard.
  5. Make the custard: Combine the cream, milk, and flour in a bowl. Whisk until smooth. Add the eggs, egg yolk, salt, and pepper, and whisk until smooth.
  6. Fill the quiche: Sprinkle half of the cheese evenly over the bottom of the crust. Sprinkle the mix-ins on top, spreading them out as much as possible. Make sure that you can see the cheese and crust below - the custard filling needs to be able to get through. Sprinkle the remaining cheese on top. Slowly and evenly pour in the custard, taking it as high to the brim as possible. 
  7. Bake the quiche for 55 to 65 minutes, or until it no longer shimmies when shook. (If the crust starts to brown too much mid-bake, you can carefully tent it with foil.) Let cool until warm before serving.
Shopping List
1 cup heavy cream
1 cup whole milk
3 tablespoons all-purpose flour
5 large eggs
1 large egg yolk
1 3/4 teaspoons kosher salt
3/4 teaspoon freshly ground black pepper
1 to 1 1/4 cups mix-ins
1 cup grated cheese

Quick Cinnamon Roll Caserole

6.17.2019

... and when I say Quick, I really mean quick. This whole recipe was complete from start to finish in about 75 minutes - which is impressive considering its not just a "dump it all in" casserole. You have legit manual labor to do here.

I was in the market for a good Father's Day breakfast dish. Typically I default to a batch of Monkey Bread for just about every holiday. It's incredibly easy and customizable. Christmas time? Make the glaze with eggnog. Summer? Toss some blueberries in. But I felt like doing something a little different.

I've made quick cinnamon rolls before but nothing quite as simple and straight forward at these. I would just about guarantee you already have everything you need - except for the cream cheese in the frosting. It was rather astounding.

That being said, I don't think the flavors in this were incredibly deep. To me, it did taste like I had only spent one quick morning on it. Everyone else that consumed it loved it for one reason or another. My dad said he liked it more than monkey bread. Monkey bread is loaded up with sugar and sweetness and this was a gentler version of that.

A few notes:

  • The dough is a very quick dough. As a result, you do need frosting or glaze to amp up the appeal. 
  • The filling is very important. Do not skimp on this at all. Go heavy. I doubled what the recipe originally called for. I have no idea how they got by with it.
  • Frosting. It might seem silly but absolutely whip the frosted for 3-5 minutes. Yes, it will be fully mixed after a few seconds but the extra time really lightens it up and gives it a wonderful whipped texture. Highly recommend.
Frosting on the side? I added all the frosting before serving just to make it easy. I stand by this too because it helped people not stress about cutting a roll in half. That being said, my mom felt like I could have cut back on the frosting. So just think about your audience and go with your sugar filled gut.

Here's how it goes:


  1. In a medium bowl, dissolve yeast and sugar in warm water. Let stand until creamy, about 10 minutes.
  2. Stir in flour, salt, and oil. Beat until smooth. Let rest for 5 minutes.
  3. Turn dough out onto a lightly floured surface. Roll to 1/4 or 1/2 inch thick.
  4. Heat oven to 350°F (or 325°F in a convection) and dish with bakers spray or butter.
  5. In a small bowl, combine butter, brown sugar and cinnamon with a fork.
  6. Spread brown sugar and spice mixture over dough making sure it covers entire surface.
  7. Starting at either end of the dough roll it up like a log. I tend to go with the longer edge, but either is fine. It'll just affect the size of the roll at the end.
  8. Cut the log into even pieces and place in dish so that layers of the roll is visible.
  9. Bake for 25-35 minutes. 
  10. While the rolls are baking in the oven, make your frosting. Add cream cheese, butter, confectioners sugar, and vanilla in stand mixer fitted with paddle attachment.
  11. Mix on low to just combine. Once ingredients are all incorporated turn mixer on high and leave it for 3-4 minutes. Frosting should be light and fluffy.
  12. When rolls are done baking allow them to cool for up to five minutes before frosting.

Shopping List
dough
1 1/2 packages active dry yeast
1 1/2 teaspoon white sugar
1 1/2 cup warm water (110 degrees F)
3 3/4 cups flour
3 tablespoons olive oil

filling
5 tbsp. butter, room temperature
1/2 cup packed brown sugar
2 tbsp. McCormick® Cinnamon

frosting
4 oz cream cheese, softened
5 tbsp butter, softened
2 1/4 cup confectioners' sugar, sifted
2 tsp. vanilla extract

cinnamon banana muffins

6.08.2019

Feel free to file these under "fastest muffin making". 

I've been slowly working through a batch of very ripe bananas. It would be easiest to just eat them or put them in a smoothie - but oddly that feels like more work that baking with them. Last week I made this DELICIOUS banana cake that was so very very good. This weekend, I whipped up these cinnamon banana muffins very quickly on Saturday morning. 

The muffins are a home run. They are so light and delicious - but would be very boring without the sugary topping. Yes, it would be healthier but also sad. It takes minimal seconds to melt the butter and dip them so don't scrimp on it. It just will not be worth it.

I still have 2 bananas left so I'm not quite sure what I'm going to do with them. Only time will tell.

  1. Heat oven to 375 degrees. Spray 12 regular-size muffin cups with cooking spray.
  2. In medium bowl, combine the sugar, oil, eggs and stir with wire whisk. Add in bananas and vanilla, whisk until combined.
  3. Add in flour, baking soda, salt, and cinnamon and stir together until just combined.
  4. Divide batter evenly among muffin cups. Each muffin cup will be almost to the top. About 3/4 full.
  5. Bake 17 to 21 minutes. Remove muffins from pan to a cooling rack.
  6. For the cinnamon & sugar topping : Combine the sugar and cinnamon in a small bowl. Put melted butter in a separate small bowl. Dip muffin tops into melted butter and then into cinnamon-sugar. Serve warm or let cool completely.
Shopping List
banana bread muffins2/3 cup granulated sugar
1/2 cup vegetable or canola oil
2 large eggs
2 mashed bananas
1 teaspoon vanilla extract
1 2/3 cup all-purpose flour
1 teaspoon baking soda
1 teaspoon ground cinnamon

topping3 tablespoons butter, melted
1/4 cup granulated sugar
1 teaspoon ground cinnamon

very delicious blueberry cake

3.10.2019

Ok - this picture doesn't exactly look like a success story. Where are all the blueberries? In the bottom of the loaf. Not the best. But, I'll do better next time.

Blueberry distribution aside ... this cake is incredibly delicious. That might have something to do with the amount of sugar and butter or just magic. The original recipe called for a bundt cake but I wanted to stretch my work a little further - so I opted for two loaf pans. Also, the bundt cake was going to take like 90 minutes to cook... and I didn't start this until 9 pm.

There really isn't a whole lot to say about this except that it tastes wonderful and you'll enjoy it. I made this along with a batch of pan monkey bread for an event my dad was hosting. Although monkey bread is delicious, this blueberry loaf was dominated within an hour.

Although this loaf is great with or without a glaze, I definitely recommend whipping one up. I made mine extra thick with only buttermilk and powdered sugar. The wonderful thing about these simple glazes is that you can adjust them so easily. Too thick? More liquid. Too thin? More powdered sugar.
  1. Preheat the oven to 325 F. Grease your chosen pan or pans and dust with flour.
  2. Cream the butter and sugar together until light and fluffy. Then beat in the eggs and vanilla. Mix the flour, baking powder, baking soda, and salt in a separate bowl. Turn the mixer on low and slowly add the flour and buttermilk, alternating each, until all incorporated. Finally beat in the lemon zest before turning the mixer off. Use a spoon the stir in half the blueberries.
  3. Pour the batter into the prepared pan and sprinkle the remaining blueberries over the top. 
  4. Bake for 45-60 mins [2 loaf pans] or 60-80 minutes [1 pan], until a toothpick inserted into the center comes out clean. 
  5. Allow it to cool for at least 20 minutes before flipping out onto a cooling rack. 
  6. For the glaze, whisk the buttermilk and powdered sugar in a small bowl. Drizzle the glaze over the cake.
Shopping List
For the Blueberry Cake:1 cup unsalted butter, softened
2 cups sugar
3 large eggs
1 tablespoon vanilla extract
2 3/4 cups all purpose Gold Medal Flour
2 teaspoons baking powder
1/2 teaspoon baking soda
1/2 teaspoon salt
1 1/4 cup buttermilk
Zest of 2 lemons
1 pound fresh blueberries

For the Buttermilk Glaze:3 tablespoons buttermilk
1 cup powdered sugar

miso banana bread

2.21.2019

I'm not really a banana person but I do love banana bread. It's like a sneaky, potentially healthy breakfast dessert. I saw a reference a couple weeks ago to miso banana bread. A miso banana bread feels like a lifetime of difference from the other variations like: nutella, peanut butter, chocolate, or just straight up banana bread.

I've only bought miso paste one other time in my life and it turns out I never wrote up the recipe. I think it was something like a miso carrot soup if my memory serves me. I know very little about buying miso paste except that there are different colors. The original recipe called for white paste, but Whole Foods was out of that... so red paste it is. For what it's worth here are the differences according to kitchn.com:
  • White Miso: This miso is made from soybeans that have been fermented with a large percentage of rice. The miso has a definite sweet taste. It’s best used in condiments like mayo or salad dressings, or in light sauces.
  • Red Miso: This is also typically made from soybeans fermented with barley or other grains, though with a higher percentage of soybeans and/or a longer fermentation period. The deep umami flavor of red miso can overwhelm mild dishes, but is perfect for hearty soups, braises, and glazes.
Based on that, hindsight might have been to wait for white miso paste to be available.... but too late because I already baked the bread. It is so different - and great. It is hard to describe the difference in flavor but it is rich and the opposite of a sugary quick bread.

As of now I've made this recipe twice. First time? The original recipe called for just one big loaf - which I did.  It requires such a long cooking time that the top gets a little bit more toasted than I'd like. Candidly, I found a few spots in the bread that could have been cooked longer too. Second time? Split the batch into two smaller pans. Total win. The cooking time is about half (50 mins or so) and completely cooked through.
  1. Preheat the oven to 350°. Butter and flour a 10-by-5-inch metal loaf pan. In a bowl, using 
a fork, mash 4 of the bananas until chunky. In another bowl, whisk the flour, baking soda, baking powder and salt.
  2. Using a stand mixer fitted with the paddle, cream the butter, sugar and miso at medium speed until fluffy, about 5 minutes. At low speed, slowly add the buttermilk, then beat in 
the eggs 1 at a time until incorporated. Beat in the mashed bananas; the batter will look curdled. Add the dry ingredients and mix until just blended. Scrape into the prepared pan.
  3. Bake for 
90 minutes, or until a toothpick inserted in the center comes out clean. Let the bread cool on a rack for 30 minutes before turning out to cool completely.
Shopping List
4 medium overripe bananas
1 3/4 cups all-purpose flour
1 teaspoon baking soda
1/2 teaspoon baking powder
1/4 teaspoon kosher salt
1 stick unsalted butter, softened
1 cup sugar
1/4 cup white miso
1/2 cup buttermilk
2 large eggs

blueberry coconut basil cloud scones

9.04.2018


It has been quite a while since my last batch of scones. I just haven't really been cooking much this summer - and I normally make scones when I'm having people over for breakfast. My traditional scone recipe is rather intensive. It yields incredible results - but you are at it for a while. Lots of steps. Too many steps for a hot summer weekend.

You know what has like zero steps? This scone recipe. And, if I'm being honest... the results are perhaps better. Scones are always wonderfully fluffy and soft. Perfect about of crumble happening. All you need really is a can of coconut milk. Impressive right? 

I was having a couple friends over for breakfast and to talk genealogy. If you happen to keep frozen or fresh fruit around, you can really use just about anything. I went with some blueberries that I had picked a couple weeks prior before the patch closed down for the season. They are perfectly small - just like Maine blueberries - which makes them excellent for scones in my opinion. You can consider the basil optional if you'd like. I used so little of it because I didn't want to overpower it. I also had no idea what would happen to basil when you bake it. 

  1. Line a baking sheet with parchment paper. 
  2. Whisk together sugar, flour, baking powder, and salt in a medium bowl. Combine coconut milk and coconut extract; drizzle over flour mixture and fold in just until flour is incorporated and a shaggy dough forms. Add in the frozen blueberries and basil about half way through mixing.
  3. Divide dough in half and turn out on a lightly floured board. Use lightly floured hands to pat each half into a 6-inch circle. Cut each circle into 6 wedges and gently pull apart. Use a spatula to gently (again) place scones on the baking sheet.
  4. Chill baking sheet in the freezer for 20 minutes while preheating oven to 425°F. 
  5. Brush scones with coconut milk and bake for 16 minutes. Cook until tops are set, edges are beginning to turn golden, and a toothpick inserted in the center comes out clean. 
  6. Let scones cool / rest for about 5 minutes before drizzling with glaze. For the glaze, whisk together powdered sugar and coconut milk in a small bowl. Drizzle glaze over scones.
Shopping List (based on this original recipe)
Scones 
1/2 cup sugar 
1/3 cup sweetened shredded coconut 
3 cups flour 
1 Tbsp baking powder 
1 tsp salt 
1 can full fat coconut milk (1 1/2 cups)
1/8 tsp pure coconut extract 
1 cup (or so) frozen blueberries
1/4 cup finely sliced basil (optional)

Glaze 
1/2 cup powdered sugar, sifted 
2 Tbsp full fat coconut milk 

coconut blueberry pancakes

1.05.2018

I'm on day two of "snowstorm diet" which pretty much means "eat whatever I want" kind of but cook all the time. For lunch I had zucchini latkes over arugula. For dinner, we had prosciutto pizza with an arugula feta salad and tumeric sweet potatoes. This meal can also be called "the time I got my family eat tumeric". They will normally eat what I make largely because I don't tell them what it is until they take a bite.

BUT - these pancakes! I had a little extra time for breakfast on this final snowday and wanted something beyond sourdough toast. This recipe came up pretty quick in my search and I jumped right in. These pancakes come together super fast, are super tasty, and a nice change. One of our favorite childhood dinners was pancake night. I'm not sure that 10 year old me would choose these but they are super flavorful. The sweetness from the blueberries and coconut is a real treat.

After a mentally challenging week, I woke up today and just had an inclination that commuting would be terrible. So I decided to work from home. Between the frozen pipes on Sunday, Monday, and Tuesday ... then the blizzard on Thursday, I needed an easy relatively productive day. I had a feeling the trains would be bad. But they worked fine all day - until 5pm rolled around and everything collapsed. While part of my sympathizes with all those sad commuters, another part of me feels victorious for predicting it 13 hours earlier in my bed drinking morning coffee.
 

But here's how to make these pancakes.
  1. Whisk all the ingredients (flour through coconut extract) together in a large bowl. 
  2. Drop 1/4 cup worth of batter at a time onto a heated, buttery pan. After letting the pancake cook for about a minute, sprinkle with a bunch of blueberries and shredded coconut, pressing toppings in slightly. 
  3. Flip after about a minute or so. Just use your normal pancake logic here.
  4. Serve with extra blueberries and maybe a little more coconut. Live a little. 
Shopping List
1 cup flour
1 tablespoon sugar
1 teaspoon baking powder
1/2 teaspoon baking soda
1 cup milk
1 tablespoon coconut oil
1 egg, beaten
1/2 tsp coconut extract
Shredded coconut
blueberries
Maple syrup, for serving

gingerbread monkey bread

12.25.2017

Christmas morning is very much about traditions. For as long as I can remember we've spent it at my Aunt's house. There are a few factors that never change: we are always late because of church and the menu. It would be weird if we didn't have blueberry french toast and egg sausage casserole. Even last year when kitchens were being renovated, my aunt still made the dishes and just cooked them somewhere else.

A few years back, I started making monkey bread to bring to the table. Monkey bread is insanely easy and kid friendly. The only thing that is (slightly) complicated about it is when to take it out of the oven. This year my mom seemed disappointed that I wasn't making egg nog monkey bread, but I just couldn't stomach another trip to the store for one more item.

But this morning when I was whipping it up, I added in a few extra spices to transform it from just a simple cinnamon to a gingerbread version. The gingerbread flavoring is subtle enough that if you aren't a fan of the cookies you won't be too upset. A hint of gingerbread goes a long way :)

Here's how it goes.
  1. Preheat oven to 350 F and grease your bundt pan
  2. Combine all the sugars and spices in a bowl.
  3. Open your rolls and cut into small pieces. Toss the small pieces into the sugar to coat.
  4. Layer the dough into the pan relatively evenly but also don't worry too much about it.
  5. After you've got all your dough in the pan, drizzle a combination of the melted butter and molasses over the top. Have extra sugar mixture? Sprinkle a little more on there.
  6. Bake for 30-35 minutes. Let cool a bit before trying to remove from the pan.
  7. Serve!
Shopping List
2 cans of biscuits (Grands style)
1 cup light brown sugar, packed
1/3 cup white sugar
1/2 teaspoon ground cinnamon
1/4 teaspoon ground nutmeg
1/4 teaspoon ground ginger
1/4 teaspoon ground clove
1/2 cup (1 sticks) melted butter
1 tablespoon molasses

harvest scones

11.23.2017


I've been itching to make scones for several weeks now - and today was the day.

When I put up my Christmas tree last week, I felt like I had some gingerbread scones on the brain. But with Thanksgiving happening, I pulled a switcheroo and went with some pumpkin. I am not a "pumpkin" person per se. I never opt for pumpkin because it feels so abused and sometimes the flavoring is so strong. But, these scones are perfection.

While I love making scones, I sometimes skip it because my method can be so arduous. But when I discovered how to make amazing scones, I just couldn't go back. The frozen butter and then subsequent freezing steps just take it to the next level. But - I just couldn't motivate for all the steps tonight. So instead I took a few shortcuts:
  1. grated frozen butter / absolutely important, can't skip this
  2. after making the dough, shape into a flat disk or square shape then put in the freezer for 5 minutes / no need to roll out the dough just keep it cold.
  3. take the dough out of the freezer, and cut into scones. put back in the freezer for 30 minutes. / this step is another can't miss. it's really important.
The steps might still seem like a lot - but I promise that it is less work than the original steps that include a rolling pin and flour all over your counter. Takeaways? Frozen dough is critical to scone perfection.
  1. Grate your frozen butter into a bowl and put it back in the freezer to keep it cold.
  2. In a large mixing bowl, whisk together the flour, sugar, baking powder, salt, and spices.
  3. In a separate mixing bowl, whisk together the pumpkin and eggs till smooth.
  4. Add the frozen butter to the bowl and mix to combine. Then add the pumpkin/egg to the dry ingredients and stir until all is moistened and holds together. You might need to add a little milk to get everything together.
  5. Dump the dough into some flour covered parchment. Shape into a disk or rectangle and then put in the freezer for 5-10 minutes while you prep the oven and baking sheet.
  6. Line a baking sheet with parchment and preheat the oven to 425.
  7. Take your dough from the freezer and cut into whatever shape you want. Place scones on the baking sheet and then put the uncovered sheet in the freezer for up to 30 minutes.
  8. Brush each scone with melted butter and then bake for 20-25 minutes in the oven. 
  9. If desired, make a simple glaze of powdered sugar and milk. Sprinkle the top of the glazed scone with chopped cranberries.
Shopping List
2 3/4 cups flour
1/3 cup sugar
1 tablespoon baking powder
3/4 teaspoon salt
3/4 teaspoon ground cinnamon + 1/4 teaspoon each ground ginger, nutmeg, and allspice
1/2 cup frozen butter
1/2 can of pumpkin
2 large eggs
dried cranberries

mocha nut donuts

9.03.2017

I am not a chocolate person per say. I skew bacon and salt. I know those aren't the same - but it's true. I have an addiction to salt. I got it from my grandmother along with night terrors - both great traits. I'm a real catch. All that being said, I have frequently send urgent text messages to my sister demanding brownies. 

So, while these chocolate donuts are a little bit out of character for me... they are pretty much like a circle brownie that you can eat at breakfast time without judgement. The recipe comes out with probably 2 dozen mini donuts... and you'll need every one of those. You'll probably eat two just to be sure they taste good.

The real driver for making these came from needing to return my neighbor's plate. They brought it over to me with lobster on it... and it just felt right to return it with a little something. Their house is always BUMPING with people so mini donuts seemed like a good solution. I originally started off thinking about a coffee cake donut but after some googling ended up with this mocha situation. I'll be making another batch pretty soon because my baby brother politely requested a shipment at school.
So here's how they go. It's all real straight forward and easy... until you start melting chocolate. That's where I begin to unravel and literally get it everywhere... but maybe you are a stronger person than I am. All in, you could get these donuts from ingredients to countertop in less than an hour and that sounds pretty good to me. Just pick up this donut pan from Amazon and you'll be ready to roll.
Making the donuts
  1. Preheat the oven to 350F for the donuts. Grease your donut pan.
  2. In a large bowl, mix together flour, cocoa powder, brown sugar, espresso powder, baking soda, and baking powder. Set aside.
  3. In a separate bowl, whisk egg, sour cream, milk, and coconut oil. Add the wet ingredients to the dry, whisking to combine.
  4. I added a little more milk to my dough to get it a tiny bit "looser". You don't want it to be thin like a pancake or even like cake mix, but it made it a bit easier to put in the donut pan. I'm sorry I can't be more specific here but just trust yourself and maybe add a dash of milk. Maybe.
  5. Transfer mixture into a pastry bag or large ziplock with a hole cut into the corner. Pipe batter into donut molds. For full size donuts, aim for 2/3 full. For mini donuts, it's harder to do anything less than 100% full but just be sure to not cover the place where the hole is.
  6. Bake for 12 minutes.
Assembly and the glazes
  1. For the crunchy topping, combine some chopped walnuts, brown sugar, and a touch of cocoa powder. It's not a science so use the proportions of things you like the most.
  2. Melt your chocolate via double broiler (or microwave if you are very talented). I always add butter or coconut oil to smooth out the chocolate but it can be optional. 
  3. Dip each donut into the glaze, then dip into the crunch topping. Allow to cool slightly before eating.
Shopping List
for the donuts1½ cups all-purpose flour
½ cup cocoa
⅓ cup light brown sugar
2 teaspoons espresso powder
½ teaspoon baking powder
½ teaspoon baking soda
1 large egg, room temperature
⅓ cup sour cream
⅓ cup milk
⅓ cup coconut oil

for the glaze & crunchdark chocolate chips
2 tsp coconut oil
chopped walnuts
brown sugar
cocoa powder

blueberry ricotta cake

8.06.2017


This recipe has been sitting on my kitchen counter for over a month - so it's good that I finally got to it I guess. The original recipe called for raspberries but there is no good reason for that - especially when you have perfectly ripe and freshly picked blueberries. I was on vacation for a few days and went blueberry picking three times. So, I have a few to spare.

This cake is a homerun on about a million levels but I'll give you a few examples. It's so easy to make. It's incredibly light and fluffy. It's perfectly customizable. As I was making this I was tempted to toss in some slivered almond and swap out the almond extract for coconut. I feel like there are countless ways to just use this simple ricotta cake base. 
 While the original recipe called for a round cake pan, I only had two loaf pans around. Here are my thoughts on that. The round pan is better for presentation sake. Like think about going to a brunch and bringing it like that. But - the loaf pans are better for durability. This cake is so incredible moist that the loaf slices hold together a bit better. It's less fragile and easier to transport. I know this because I put it in my bike basket and dropped one off at my parents house.

Here's how it goes.
  1. Preheat oven to 350°. Lightly coat a baking pan with nonstick spray. 
  2. Whisk flour, sugar, baking powder, and salt in a large bowl.
  3. Whisk eggs, ricotta, and vanilla in a medium bowl until smooth; fold into dry ingredients just until blended. 
  4. Then fold in butter, followed by 1 cup frozen berries. 
  5. Distribute the batter into your chosen pan(s). Original recipe was 9 in round pan, I went with 2 8 inch loaf pans.
  6. Bake cake until golden brown and a tester inserted into the center comes out clean, 50–60 minutes. Let cool at least 20 minutes before unmolding.
Shopping List
Nonstick vegetable oil spray
1½ cups all-purpose flour
1 cup sugar
2 teaspoons baking powder
¾ teaspoon kosher salt
3 large eggs
1½ cups ricotta
½ teaspoon vanilla extract
½ cup (1 stick) butter, melted
1 cup frozen blueberries

blueberry croissant french toast

5.22.2017


Sometimes, I write up recipes because they are an amazing success. I practically sprint to the computer and do it that same night. I'm so excited to write it all up. Other times, I'm writing up a moderate win pretty much to make sure I do better the next time.

This is one of the later examples. This was good - but I can be better. And unfortunately, the thing that I think could make it better was actually my first inclination. The answer is always more bread. Or Cheese. But in this case bread.

I had seen an Instagram post for some beautiful blueberry croissant baked french toast. I was rather immediately sold on the whole thing. So I made a trip to Trader Joe's to pick up the essentials... and my parents backyard to pick up the eggs. All the chickens are back to laying eggs... which means we don't need to buy eggs again until the winter. When I was standing in the bread section of Trader Joe's, I also grabbed a loaf of Sourdough bread. I wasn't confident that 6 big croissants was enough.

Here are a few notes about this dish:
  • Add bread // the croissants are so light... that they don't seem to absorb all the eggy mixture. This is fine if you like the dish on the eggy side instead of the french toast side - but it also just makes it super light. Adding a few slices of torn bread to the dish would have given a bit of heft that would have been greatly appreciated
  • Sugary topping // Everything deserves a little sugar topping. It's never a mistake. I combined some chopped walnuts, butter, and brown sugar - and drizzled it rather heavily over everything. Don't skip this. You'll regret it.  
  • Blueberries // Fun story. These blueberries are leftover from blueberry picking last summer. 
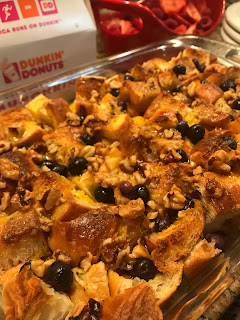
But here's how it goes. BTW - this was for Mother's Day ... and yes, you should always have Dunkin Donut holes at a brunch. Always.
  1. Grease your pan and heat the oven to 375 F
  2. Add your roughly chopped croissant to the dish.
  3. Mix up the eggs, milk, and all other ingredients. Pour over the croissants.
  4. Combine the topping ingredients and sprinkle over the dish
  5. Bake for 35 minutes or so - until your eggs are set.
  6. Eat!

Shopping List
10 croissants, cubed (or 7 large ones)
8 large eggs
1 teaspoon vanilla extract
1⁄4 cup brown sugar
1⁄2 cup milk
2 teaspoons cinnamon
1 cup blueberries (or more?)

topping
1 teaspoon nutmeg, fresh grated
1⁄2 cup walnuts, toasted rough chopped
1⁄4 cup butter, diced
1⁄2 cup brown sugar

Funfetti Pancakes

5.14.2017

I was listening to a podcast yesterday and the person being interviewed was talking about the importance of understanding what goes into all your food. Now, I'll admit that my diet in the last couple months hasn't deserved any blue ribbon awards. But - when I was standing in my kitchen last night opening and closing cabinets, staring at the refrigerator, and pacing back and forth ... I had no idea what to make.

Then, it came to me. I wanted pancakes. Homemade pancakes are shockingly easy to make. While I agree that Bisquick is delicious, you don't absolutely need it. Plus, when you make things from scratch you know everything that is inside that meal. Now I know that funfetti pancakes have 7 ingredients and only take you like 15 minutes to make. If you happen to be texting at the same time, it'll take you 20. To be completely honest, I only made these whole wheat because I was completely out of regular flour. I'm pretty confident that I'm not any healthier for it because of the sprinkles, syrup, and butter.... but it still feels like a win. Also, it made a dent in the giant container of sprinkles I had to buy for the funfetti cinnamon rolls.

So here's how it goes. Essentially mix it all together and then put it on a griddle.

  1. Combine your dry ingredients - flour, baking powder, sugar.
  2. Combine your wet ingredients - eggs and milk.
  3. Mix your two bowls together and then add in the melted butter. If you have lemon juice, you can add it now.
  4. While your pan / skillet / griddle gets hot, you can add in your sprinkles. I didn't exactly measure, but just start with 1/4 cup and add until you get the right balance you are hoping for.
  5. Cook your pancakes as you normally would.

Shopping List (makes about 9ish pancakes)
2 cups flour (half whole wheat)
2 tsp baking powder
1 tbsp sugar
2 tbsp melted butter
2 eggs
2 tsp lemon juice (optional)
1/4 - 1/2 cup of sprinkles
1 1/2 cup of milk

funfetti cinnamon rolls

4.02.2017

I made funfetti cinnamon rolls... because I'm a giant adult.

I was invited - or I invited myself, it's hard to keep track - over to a neighbor's house for dinner this weekend. They were already covering the pizza and salad - so I wasn't sure what to bring. They have two adorable little girls so my brain immediately jumped to funfetti cinnamon rolls. I had seen a hacky video of someone making them this week and it made perfect sense. They used like fridge dough and then cake mix? Honestly, seems more challenging than this recipe here.
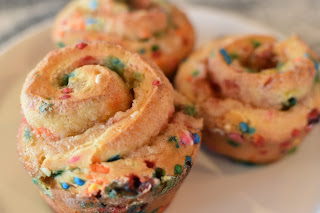
These cinnamon rolls looked so good coming out of the oven that I rather immediately ate one - despite dinner being right around the corner. They were amazing warm. I always feel like cinnamon rolls like this need a glaze - but for some reason it just isn't necessary here. 

A few notes:
  • This recipe is really easy. The only things that are important are your initial water temperature (so you don't kill the yeast) and planing enough time for the dough to rise. If you need immediate cinnamon rolls, here is a recipe for that.
  • Dough cutting - I was trying to make the dough stretch enough for the hosting gift - and give me 2 or 3 rolls for testing (and eating). The original recipe says this will make 12 rolls but I probably managed to get up to 16 or so. The thinest I would slice the dough log is probably just over 1 inch.
  • Baking - I baked this recipe two ways: (1) in a muffin pan and (2) in a disposable round pan. The muffin pan is the perfect method as far as I'm concerned but the disposable pan made gifting them so much easier. I'll absolutely do this again and might even try just putting 2 or 3 rolls in a baby loaf pan as well.
Here's how it goes.
  1. In the bowl of a stand mixer, sprinkle yeast over water and milk. Add 1 Tbsp sugar and stir to combine. Let sit for 5-7 minutes to allow mixture to bubble and active.
  2. After the yeast is foamy, mix together the remaining sugar, egg, and egg yolk.
  3. Switch to the dough hook and begin adding in flour. Add 2 cups to start, mix it, then another cup of flour.
  4. While the mixer is still on low, add in small pieces of the softened butter. I went with like 1/2 Tbsp slices. BUT - add them in one at a time. When you've finished adding in all the butter, then add the last cup of flour and knead the dough until it is smooth and pulls back from the sides of the bowl.
  5. Add in your confetti sprinkles in thirds. It doesn't have to be precise but it'll help to get the sprinkles more evenly distributed in the dough. Ideally, you can do this while the mixer is still on low - but this is how I spilled sprinkles all over the counter.
  6. Transfer the dough to a lightly greased bowl and cover with plastic wrap. Let it rest until it has doubled in size (approx. 1 hour)
  7. Dump the risen dough on a lightly floured surface and roll into a rectangle. The dough will be so beautiful! This isn't really scientific - but it'll be maybe about 1/3 inch thick.
  8. For the filling, combine softened (or melted) butter with the sugar, brown sugar, and cinnamon. Spread this over the rolled out dough.
  9. Roll the dough into a long log and sliced into the sizing you want. 
  10. Cook in a 350F preheated oven  for about 30 minutes. The time will depend a bit on the size of rolls you cut and the pan you cook them in.
Recipe is slightly adapted from this original post on The Little EpicureanShopping List
1/2 cup warm water
1/2 cup whole milk, room temperature
2 1/4 tsp dry active yeast
1/4 cup + 1 Tbsp granulated sugar
1 large egg
1 large yolk
4 cups flour
5 Tbsp butter, room temperature
1/2 cup confetti sprinkles
Cinnamon Sugar Filling:1/3 cup butter, softened
1/3 cup granulated sugar
1/3 cup dark brown sugar, packed
1 Tbsp ground cinnamon

clodagh bread

3.06.2017


For like the last 10+ years I've made Irish Soda bread each year for St Patrick's Day. I've really pared back the baking in recent years - but there were some years that I shipped out 8 or so loaves. This year I think I only have 4 loaves on my list - and one belongs to me. But, last week when I was tearing through some magazines I came across this run of recipes for St. Patrick's Day ... and they all looked really great.

... But this clodagh bread captured my attention. When I tore out the recipe, I neglected to save the picture but I remember it being kind of an enchanting rustic loaf of bread. Irish soda bread feels country and rustic. For pretty much no good reason, Clodagh bread does not. It's perhaps in part because I still am not sure how to actually say "clodagh".

Some things that are really unique about this bread?
  • 7 ingredients - of which 2 are types of flour. You could probably make this bread right now ... if you have whole milk. Because of the lack of fat via shortening or butter, I think the whole milk and whole milk yogurt is actually important.
  • Glaze. I was really questioning whether or not I was doing this right - but I painted the entire loaf pretty aggressively with the yogurt milk mixture. After 30 minutes in the oven, the loaf gets this incredible shine that my bread has never had before.
After mixing the ingredients, my dough was much drier than I expected. If I had more whole milk or yogurt, I would have liked to add a little more in to pull the dough together better. I was pretty worried that the bread would be very dry - but the glaze adds a great deal of unexpected moisture. It's absolutely required. I'm still going to make Irish Soda Bread this year but it's nice to have another traditional Irish recipe in my repertoire.
Here's how it goes.
  1. Preheat the oven to 425°. Into a large bowl, combine the two types of flour, baking soda, sea salt and rosemary. Ideally, you'd sift the flours together but life isn't always ideal - just combine them as you would.
  2. In a separate bowl, whisk 1 3/4 cups milk and 1 cup yogurt. Slowly pour the milk mixture into the well in the flour mixture. Combine either with a wooden spoon or by using a dough hook on a stand mixer. 
  3. Using lightly floured hands, dump the dough on the counter. I decided to split the loaf into two for easier sharing. Shape the dough into a round loaf and transfer to a baking sheet. 
  4. Cut a large X into the top of the dough. Cut about an inch through for the X (or up to 2/3 of the way through the loaf).
  5. In a small bowl, whisk the remaining 2 tbsp. milk and 2 tbsp. yogurt. Using a pastry brush, coat the bread with the milk and yogurt mixture. Sprinkle with sea salt.
  6. Bake 20 minutes. Reduce the heat to 375° and bake until the top is dry and deep golden brown and the bread sounds hollow when tapped on the bottom, about 35 minutes. Let cool on a wire rack, at least 2 hours.
Shopping List (adapted from this original recipe)
2 cups all-purpose flour
1 1/2 tsp. baking soda
3 1/2 cups whole-wheat flour
1 1/2 tsp. flaky sea salt
1 tsp. finely chopped fresh rosemary
1 3/4 cups plus 2 tbsp. whole milk
1 cup plus 2 tbsp. plain whole-milk yogurt

peanut butter quinoa banana bread

2.26.2017


I think sometimes when people think of banana bread - they get this visions of a dense banana loaf with nuts. While that isn't a terrible thing by any standard, it's always nice to try something different. Let's give banana bread a refresh. Maybe it'll be the new scone? Probably not.

I was home sick for a few days this week - and do mean the literal definition of a few. I was home for three days with some unfriendly rollercoaster of a cold. Started with a fever, then no voice, then a cough, then a scratchy throat. Super great. But the entire time, I was watching a pair of bananas get darker and darker on the window sill. By the time I got around to actually using them on Saturday night, I was actually worried they might be too ripe. But they weren't - and now we have some delicious banana bread.

I did some googling last week from the couch for different banana bread varieties and came upon a few that could be good in the future:
  • black bottomed banana bread
  • brown butter banana bread with ginger
  • buttermilk banana bread
  • chia seed & citrus banana bread
  • strawberry banana bread
I ended up combining a few for this new version of peanut butter quinoa banana bread. While I knew that I would like the combo, I did run it by my sister for a second vote and she was on board. For some reason, this loaf comes out very light and airy. Almost a bit more of a muffin consistency than a loaf - which is fine with me.
Here's how it goes.
  1. Preheat oven to 375 F and pull out whatever pans you'd like to use. This recipe will make loaf pans easily.
  2. Combine the bananas, egg, and sugar in the bowl of your stand mixer. Once well combined, then you can add in the quinoa, butter, and peanut butter. 
  3. In a separate bowl, mix together your dry ingredients (flour, baking soda, baking powder) and then add to the wet ingredients in batches. 
  4. Once your batter is combined, then you can divide it evenly into your lightly greased pans. 
  5. Bake for approx. 30 minutes in the oven. Time can vary depending on pan size - so just keep an eye on it.
Shopping List
3 ripe bananas
1 egg
3/4 cup of sugar
3 tablespoons of quinoa
2 tsp melted butter
1/2 cup creamy peanut butter
2 cups flour
1 tsp baking powder
1 tsp baking soda
© WHAT JEN DOES • Theme by Maira G.