almond apple pie

12.31.2019

This pie got rave reviews in spite of the odds against it. What odds do you say? Well primarily because I didn't cook it enough. Adorable right?

What happened was that I was trying so hard to bake the pie in advance without overcooking my beautiful lattice work. In hindsight this was a real low risk and silly to be concerned with. I normally make things to be consumed rather immediately and then perhaps as leftovers.

I ended up making this pie again by request for my parents on New Years. If you chose to buy pre-made crust... it will take you less than 10 minutes to put together. Isn't that incredible? A delicious and impressive pie so quickly. The secret to kicking it up a notch is absolutely the almond paste. Sure, you could skip that step but then you are just making a normal apple pie.

Here's how it goes.
  1. Preheat the oven to 425°F.
  2. In a large bowl, combine the sliced apples with the lemon juice. Whisk together the sugar, flour, cinnamon, nutmeg, and salt in a separate bowl, then toss with the apples and lemon juice.
  3. Roll out your bottom crust and transfer it to a 9" pie plate. Press it up the sides.
  4. Take your almond paste, and roll it out into a thin circle, about 9" in diameter. It shouldn't be any thicker than about 1/8". Transfer the thin disc of almond paste to the pie plate and press it gently on top of your bottom crust.
  5. Fill your pie crust with the sliced apple mixture. Dot the top of the apples with the melted butter. Place in the refrigerator while you roll out the top crust.
  6. Roll out the top crust. Transfer it to the top of your pie plate and crimp the edges. Cut 5 slits in the top of the crust in the center to let steam escape. Brush the crust with milk and sprinkle with sugar (optional).
  7. Bake the pie for 15 minutes, then reduce the oven heat to 375°F and bake for 35-40 minutes more, until the fruit is soft and bubbling and the crust is golden. If the crust is browning too quickly, you can cover it with foil.
  8. Remove from the oven and let the pie cool for at least 20 minutes before serving.
Shopping List
2 pie crusts (1 for the top and 1 for the bottom)
3 pounds apples, peeled, cored, and thinly sliced (about 6 cups)
1 tablespoon lemon juice
3/4 cup sugar
1/4 cup all-purpose flour
2 teaspoons ground cinnamon
1 teaspoon ground nutmeg
1/2 teaspoon kosher salt
7 ounces almond paste
3 tablespoons butter, melted
milk + sugar, for the crust 

gingerbread macarons

12.22.2019

I have made a lot of macarons recently - or so it feels. I made two batches of peppermint macarons in early December. I got a little fancy with my piping bag food coloring to create red swirls. But this weekend, I felt the urge to make another batch but it did not feel exciting to do more peppermint ones.

That's how I ended up with gingerbread macarons.

If you can make regular macarons, there is nothing stopping you from these seasonal favorites. I was a little nervous about how the spices would affect the almond batter consistency ... even though it is such a small amount. These shells are so ridiculously finicky that you don't want to mess with them too much. The last time I made macarons I changed up my recipe a bit and I feel pretty great about them now.

What did I change? Lowered the temp significantly to 300F and added more dry ingredients to the whipped merengue. This tutorial from Tasty is the best macaron tutorial I've ever read.

  1. I will now always look for the figure 8 in my batter. Watch the demo video and you'll see what I mean.
  2. Bloom time? I had never heard of this but it makes a lot of sense. After fully assembling the macaron, you let it sit for 24 hours (or so) in an airtight container. Macarons always felt better the next day or even a couple hours later... and now I know why.
  3.  In spite of the "figure 8 technique", I think there is a chance that I'm overmixing my batter occasionally. On the Great British Baking Show, I learned that if your macaron shells feel a bit hollow it is because they are overmixed. 
  4. Absolutely whack the cooking sheet a few times to get the air bubbles out. I could literally see them come to the surface after hitting the sheet.

Other macaroon recipes I've tried: peppermint swirl, matcha coconutmargaritaraspberry with coconut fillingstandard, and these award winning Christmas cookie variety.

  1. Make the macarons: In the bowl of a food processor, combine the powdered sugar, almond flour, and ½ teaspoon of salt, and process on low speed, until extra fine. Sift the almond flour mixture through a fine-mesh sieve into a large bowl.
  2. In a separate large bowl, beat the egg whites and the remaining ½ teaspoon of salt with an electric hand mixer until soft peaks form. Gradually add the granulated sugar until fully incorporated. Continue to beat until stiff peaks form (you should be able to turn the bowl upside down without anything falling out).
  3. Add the vanilla and beat until incorporated. Add the food coloring and beat until just combined.
  4. Add about ⅓ of the sifted almond flour mixture at a time to the beaten egg whites and use a spatula to gently fold until combined. After the last addition of almond flour, continue to fold slowly until the batter falls into ribbons and you can make a figure 8 while holding the spatula up. 
  5. Transfer the macaron batter into a piping bag fitted with a round tip. 
  6. Pipe the macarons onto the parchment paper in 1½-inch (3-cm) circles, spacing at least 1-inch (2-cm) apart.
  7. Tap the baking sheet on a flat surface 5 times to release any air bubbles. 
  8. Let the macarons sit at room temperature for 30 minutes to 1 hour, until dry to the touch. This helps the feet form under the shell.
  9. Preheat the oven to 300˚F. 11 Bake the macarons for 17 minutes, until the feet are well-risen and the macarons don’t stick to the parchment paper. 
  10. Transfer the macarons to a wire rack to cool completely before filling.
Shopping List
1 ¾ cups powdered sugar
1 cup almond flour, finely ground
1 teaspoon salt, divided
3 egg whites, at room temperature
¼ cup granulated sugar
½ teaspoon vanilla extract
1/4 teaspoon cinnamon
1/8 teaspoon cloves
1/8 teaspoon nutmeg
½ teaspoon ginger

Buttercream
1 cup unsalted butter, 2 sticks, at room temperature
3 cups powdered sugar
1 teaspoon vanilla extract
3 tablespoons heavy cream
2 teaspoons of cinnamon

iced oatmeal cookies

12.21.2019

These cookies are addicting and delicious .... and I absolutely made some mistakes when I was making them. But wow, if you aren't interested in trying them ... please show yourself to the door.

Although technically an oatmeal cookie, it is lacking all the things that make people sad like raisins and a heavy oat textures. Sure there are a lot of oats in the recipe but you can't really tell because they are blended down to a finer texture.

My recipe came out a little bit different than the original but primarily because I freaked out about moisture. I was so worried about the dough not being able to keep together that I added about 3 tablespoons of melted butter to the dough. I'm a big fan of the result. They are almost permanently chewy but still strong enough to keep their shape and get covered in glaze.


To Make the Cookies:
  1. In the bowl of a food processor, grind the oats to a flour. Add the brown sugar, flour, salt, baking soda, baking powder, cinnamon, and nutmeg and process briefly to blend. 
  2. Toss in the butter cubes and process until the butter is well incorporated and the dough begins to clump and pull off the sides of the bowl. 
  3. Add the egg yolk (save the white for the icing!) and pulse until the dough comes together. If you are worried about your dough not being moist enough you can add up to 3 tbsp of melted butter.
  4. Line a work surface with a large sheet of plastic wrap or wax paper. Turn out the dough onto the lined counter and form it into a log about 10-inches long. Wrap the dough tightly. 
  5. Chill the dough for a minimum of 3 hours in the fridge.
  6. Preheat oven to 350 F and prepare 2 baking sheets with parchment paper. Use a thin, sharp knife to slice the dough log into 2 dozen rounds, each just shy of 1/2-inch thick. Transfer the rounds, evenly spaced about 2 inches apart, to the prepared baking sheets. 
  7. Bake until golden and firm on the edges. Should be between 12 - 18 minutes. Transfer the cookies to a wire rack to cool completely—they will crisp all the way through as they cool. 

To Make the Icing:
  1. In a small bowl, combine the egg white, powdered sugar, vanilla and salt. Mix until smooth and thick. 
  2. Blend in 1 teaspoon of water until smooth. 
  3. To ice the cookies, working 1 at a time, just touch the top of the cookie to the icing. Don't submerge it. 
  4. Let the excess icing drip off and then set the iced cookie on a wire rack. If the icing begins to firm while you’re dipping, give it a quick mix with a fork and perhaps add a drop or two of water if needed. 
  5. Allow the icing to dry completely before serving, about 1 hour. 
Shopping List
Dough:
1 1/2 cups old-fashioned rolled oats
3/4 cup  firmly packed dark or light brown sugar
1/2 cup  all-purpose flour spooned and leveled
1/2 teaspoon kosher salt
1/2 teaspoon baking soda
1/4 teaspoon baking powder
1/2 teaspoon ground cinnamon
1/4 teaspoon freshly grated nutmeg
1/2 cup cold unsalted butter cut into cubes + 3 tbsp melted butter (if needed)
1 large egg yolk

Icing:
1 large egg white
1 1/4 cups powdered sugar
1/4 teaspoon pure vanilla extract
1/8 teaspoon kosher salt

peppermint swirl macarons

11.27.2019

While the internet and social media can sometimes be terrible places, they have brought two wonderful things into my life. Cake decorating and macaroon videos. Both of which collided into this peppermint macaroon. 
With each passing recipe, I'm growing less and less scared of piping bags. I have also been watching the "Great British Baking Show" each night so I'm sure that helps too. 

The peppermint swirl would be better accomplished with gel food coloring but I'm not about to buy more food coloring until I finish what I have. I'm stingy like that. In full disclosure, I also used some leftover buttercream that I froze from this summer from the not so successful matcha coconut macarons. It worked like a charm and I love the coconut flavor... it was not too aggressive with the peppermint either.
  1. Set your oven to 325 F
  2. Combine your almond flour and powdered sugar in a flour sifter and sift until you have a nice, pretty pile. 
  3. In a mixing bowl, beat your egg whites with an electric mixer until nice and foamy. Gradually add the granulated sugar until they develop stiff, glossy peaks. I added my sugar in 1 tablespoon at a time. If you think your egg whites are stiff enough, they probably aren't. Keep going. One blog I read said you should be able to flip your bowl upside down ... I make enough of mess in the kitchen without doing this step, but you get the idea.
  4. Add peppermint extract and mix gently. If the mixture gets a little less stiff, just toss that mixer on again for a jiffy.
  5. After the meringue is stiff and glossy, you essentially get to mix it all up again - but none of that "folding in the egg whites" business. This is straight mixing folks. Add about half of the flour/sugar mixture and stir with your spatula until mixed. Then, add the rest and stir again.
  6. This is now a "crucial" part in the macaron process.... you need to stir until the mixture is even and smooth. A smooth mixer makes for good meringues and that is what this is all about folks. What you do is spread the batter against the sides of the bowl, then flip it back into the middle, and repeat. And repeat. And repeat times 15 or so times. Just like the flour sifting process, I thought this would be all phony and silly and not worth it, I was wrong. You can see the difference in the batter. Add in food coloring until you get the shade of green you'd like.
  7. Fill your "pastry" bag with the batter and add a few drops of food coloring. Using a knife or cake tester (something thin), gently poke down and swirl around.... not mix. 
  8. Using your pastry bag, gently squeeze the mixture out into small circles on your parchment lined baking sheet. Note: the batter will settle a bit so, don't worry too too much about having a "tip" in the middle of your circle. Just try and keep your circles in similar small sized circles - about 1.5-2 inches.
  9. After you have filled you pan with little circles, whack the sheet against the counter several times. According to the post I read, "This will set the pied or little pastry lip at the base of the cookie (an essential for an authentic macaron)." Now, set the tray aside for 30 minutes to dry. You'll know they are dry when you tap the surface of the circle and it does not stick to your finger.
  10. Place in the oven for about 8 minutes. After 8 minutes, turn the sheet so that the front-facing macarons are now towards the back of the oven for an even bake. If after 14 minutes, they are still super-soft, reduce heat to 275°, cover in aluminum foil and bake for 2 more minutes. Watch them carefully.
  11. When the macarons are done baking, take them out of the oven and let sit until cool. When they are cool, they'll pop right off the parchment but they won't before then.
  12. Fill a new pastry bag with the filling and create about 1/2 inch dot on one macaron cookie, then sandwich another on top. Be careful not to squeeze the filling out on the sides.
  13. That's it. Now eat them... and store them in the fridge.
Making the Filling
  1. In a stand mixer with a whisk attachment, cream butter on high speed until light and smooth (about 5 minutes).
  2. Reduce the speed to low and add powdered sugar. Mix until fully incorporated.
  3. Add any flavoring and mix on high speed until light and fluffy (2-3 minutes).
Shopping List
2/3 cup almond meal/flour
1 1/2 cup powdered sugar.
3 egg whites
5 tablespoons of white, granulated sugar
1 teaspoon peppermint extract
red food coloring

Filling
1/2 cup softened butter
1 1/3 cup powdered sugar
1 tsp flavored extract

my new christmas ornaments

11.21.2019


If you want to unnecessarily get people excited, tell them you need child-safe ornaments on your Christmas tree. The real story is that sweet Ginger Rose wagged her tail just right to sling one off the tree and shatter it against the table.

I knew time was ticking a bit on the ornaments I made in 2015. They are glass balls and by some miracle they made it four years without shattering one. But - I have more kids running around here these days and it was time for a change.

I like making things myself instead of buying them. Plus, then I don't feel bad when I want something different. There is limited emotional attachment to those 60 glass ornaments from 2015. Sure I do remember making them and having fun and then letting my family each make a couple - but it wasn't like I was on a special vacation and bought an ornament. For some perspective, here is the history of prior trees:
When it came time to make the ornaments this year I did a little research for some options that I thought I could pull off with yarn, balls, or fabric. But I wasn't in love with any of them. Then I stumbled upon some wooden bead ornaments on Etsy that had a Scandinavian vibe... and loved them. Thankfully Amazon Prime delivered me a whole pile of beads the next day and I was in business.

I love how neutral the ornaments and how they are all different from each other. I used every single one of my 500 beads.

peppermint meringues

11.16.2019

I've skipped right over Thanksgiving and into Christmas.

While I normally am eager to make the switch, I feel more aggressive than normal. My excuse for decorating in November used to be that I was taking advantage of having Veteran's Day off from work.  However this year, I'm just plain aggressive. I had my outdoor decor all set up a week for about a week before I turned on the lights.

In the spirit of being extremely ready for the Christmas season, I also took care of my Christmas Cookie Swap. My friend Becca of The Salted Cookie runs a swap each year. Last year I made these matcha cookies. They were good but not really amazing. I am terrible at melting chocolate... and then the subsequent dipping of cookies into the chocolate felt clumsy. 

I can't remember where I saw this initial recipe but the person talked about how irresistible these little meringues were - and they were right. They are just sweet enough and just peppermint-y enough and just the right size... you can't resist popping a couple of these into your mouth. I challenged myself to use a piping bag for this and it was quite messy in my kitchen. I'd absolutely like to get better at piping since it would be a nice addition to my cake and macaron skills. 
  1. Preheat oven to 200 degrees F. Line 2 baking sheets with parchment paper, set aside.
  2. In a large bowl beat the egg whites, cream of tartar, peppermint, and salt with a mixer on medium until soft peaks form. Gradually add the sugar, 1 tablespoon at a time beating on high. Beat well after each addition. Beat until stiff peaks form.
  3. Place a pastry bag fitted with a large star tip inside a large cup and fold excess over top of the cup. This will help hold the pastry bag in place making it easier to paint the stripes and fill with meringue. If desired, using a small paintbrush paint small stripes up the sides of the pastry bag. Carefully spoon the meringue into the bag. Pipe 1" diameter cookies onto prepared baking sheet about 1" apart.
  4. Bake for 1 1/2 hours or until meringues appear dry and firm when lightly touched. Remove and cool on a wire rack.
Shopping List
3 large egg whites
1/4 teaspoon cream of tartar
1/4 teaspoon pure peppermint extract
3/4 cup granulated sugar
Red food coloring (the gel kind works best)

ricotta banana bread

11.14.2019

Ricotta is often on the list of things I fail to finish in my fridge. A recipe will call for a half cup and then it'll just sit there slowly expiring with my good intentions. But - if I'm going to make budget decisions and buy generic cereal... I should also be mindful of my wasted $1.50 on the remaining ricotta.

Coincidentally, my mom dropped off some surprise bananas a few weeks ago. While my siblings will eat bananas as a snack, I only eat them baked. Brief flashback to the banana cakes from earlier this summer: banana cinnamon cake, cinnamon banana muffins, and banana hazelnut cake. Thankfully, ricotta can be used in a banana bread. Ricotta will give it a very moist result.... unfortunately I slightly overcooked this so some of the moisture wasn't there. But, I would definitely do this again.


  1. Preheat your oven to 350"F
  2. In a medium bowl whisk together the olive oil or melted butter and sugars together until creamy.
  3. Add the vanilla extract, ricotta cheese and heavy cream and whisk until everything is incorporated. Whisk in the eggs until you have a smooth mixture. Add the bananas and walnuts and gently toss to coat.
  4. In another large bowl whisk together all the dry ingredients: flour, baking powder, baking soda and sea salt. Make a well in the middle and pour the wet mixture inside.
  5. Using a spatula gently fold all the ingredients together.
  6. Grease a loaf pan with a dab of butter or oil and pour in the mixture.
  7. Sprinkle a few walnuts on top for garnish.
  8. Bake in the preheated oven for 1 hour or until a toothpick inserted in the center comes out clean. Transfer to a wooden cutting boar and allow to cool on a cooling rack.

Shopping list
1/2 c melted coconut oil
1/2 c white granulated sugar
1/3 c brown sugar
2 large eggs
2 tsp vanilla extract
1/2 c whole milk ricotta cheese
1 tbsp heavy cream
1 1/2 c all-purpose flour
1 tsp baking soda
1/2 tsp baking powder
3/4 c walnuts -roughly chopped + a few for garnish
2 bananas

green tomato walnut cinnamon bread

11.06.2019

 
I've been holding on to tomato growing season as long as I possibly could. I really pushed the limits this year.... but I also believe that I really utilized my tomatoes as best as I ever have. I have processed and canned a whole lot of sauce. It has been living in stacks on my kitchen counter since mid-September so time to divide up the winnings and store for Winter.

I worked pretty hard to ripen the most tomatoes possible but still ended up with many green ones. There are some fairly traditional recipes for green tomatoes: fried green tomatoes and relish. I didn't not have it in me to do any more canning so I turned to a 3rd option.... this green tomato bread. I think you can put it in the zucchini bread bucket if you are looking to classify it. 

Frankly it would be hard for this bread to be disappointing. It has all the components for success: butter, sugar, and cinnamon. The tomatoes are finely diced enough that they don't affect the consistency of the bread the way bananas sometimes do (which by the way I have a couple sitting on my counter waiting for me to tackle). To make this bread a little different, I added in walnuts and raisins. I used just what I had on hand but I would probably opt for golden raisins next time since I feel like they are sweeter.

This was so easy to make that I might pull a few more tomatoes off the vines before the next cold snap comes through... maybe there is another batch of green tomato bread in me before I put up my Christmas trees.

  1. Preheat oven to 350F. 
  2. Grease and flour two 9x5-inch loaf pans.
  3. Blend butter and sugar until smooth in a stand mixer. Add in eggs one at a time and blend until smooth.
  4. In a separate bowl, combine tomatoes, walnuts, vanilla extract, and salt together in a large bowl until well blended. 
  5. Mix flour, cinnamon, baking soda, and baking powder together in a separate bowl; stir into egg mixture until just blended. 
  6. Spoon batter into prepared loaf pans.
  7. Bake in the preheated oven until a toothpick inserted in the middle of each loaf comes out clean, about 1 hour. Let cool in the pans for about 10 minutes before transferring loaves to wire racks to cool completely.
Shopping List
2 cups finely diced green tomatoes
2 cups white sugar
1 1/2 cups chopped walnuts
1 cup canola oil
2 eggs
1 tablespoon vanilla extract
1 teaspoon salt
3 cups all-purpose flour
1/2 cup raisins
1 tablespoon ground cinnamon
1 teaspoon baking soda
1/4 teaspoon baking powder

pumpkin brown butter mac and cheese

11.05.2019

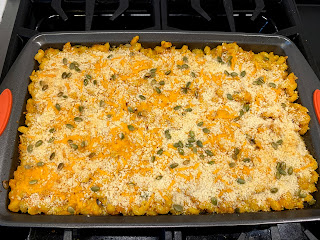
Here is another dish to sneak some veggies into your diet... also who doesn't love mac and cheese? I was hosting a small gathering for Halloween. Halloween is a big holiday in my neighborhood. Houses don't go crazy with decorations but there are endless amounts of kids running around. I buy my candy in bulk from Amazon and simultaneously pray that they come and eat it all ... and also that I don't run out.

I fell in love with this recipe from Food52 because it optimizes for crunchiness. We are a family that would fight to the death over the corner pieces from a Stouffers mac and cheese. There were some comments that it could be cheesier - and I get that. So if that is you, just amp up the cheese but honestly I loved it! You get a bit of a crunch on the bottom of the pan and on the top. The pumpkin seeds (aka pepitas) were a hit as well. My mom commented on them several times.

Here's how it goes.
  1. Heat oven to 475°F. Grease a 11x17-inch sheet pan with rimmed edges.
  2. Bring a large pot of water to a boil. Add the noodles and cook for only 4 to 5 minutes, so they’re quite al dente—just soft enough that if you taste one, there's no audible crunch. Reserve 1/2 cup of cooking water and drain the pot of pasta.
  3. In the same pot you used for the noodles, brown 6 tablespoons of butter: Cook over medium heat, stirring continuously, until it foams. The foam will recede, and the butter will be golden-tan. (If your pot is dark, you’ll know it’s ready when it starts to give off a deeply appealing rich, nutty scent.) Turn the heat down to low.
  4. Add the noodles back to the pot and immediately toss so your butter doesn’t stay on the bottom and burn. Drizzle in a few tablespoons of the hot reserved cooking water. Add the salt, pepper, three-quarters of the cheddar (about 12 ounces), Pecorino, and milk, and stir until you have a homogenous, creamy sauce. Mix in the pumpkin puree, adding a little more reserved water if needed to thin slightly. Turn off the heat.
  5. Transfer to the sheet pan, and sprinkle the remaining 4 ounces of cheddar, the panko, and the pumpkin seeds over the top. Bake for 15 to 20 minutes, until the panko is nice and toasted, and some of the cheesy noodles sticking out around the edges are tinged with amber spots.
Shopping List
2 teaspoons salt, plus more for pasta water
1 pound cavatappi (or other twisty pasta shape with lots of nooks for cheese to nestle into)
6 tablespoons butter, plus more to grease the pan
1/2 teaspoon white pepper (you can substitute black or rainbow if you prefer)
1 pound sharp cheddar, grated
4 ounces Pecorino Romano, grated
1 cup whole milk
1 can pumpkin puree (15 oz)
1 1/4 cups plain panko
1/2 cup shelled pumpkin seeds (pepitas), raw

veggie baked ziti

10.24.2019

I am 100% over eating caprese salads with burrata. I go real hard on them in July and August... so when tomato season really kicks into gear I'm just tired. Unfortunately, I made the mistake of buying more burrata at Trader Joe's one day. I was feeling ambitious and also like "I still have so many tomatoes in my garden" guilty. 

Thankfully, I scrolled past this baked ziti recipe on Instagram one day and was saved. It would be a home for so many things from the garden: tomatoes, basil, and peppers. Plus, it would be a very different use for burrata. 

If you are ever looking to sneak vegetables into a dish, this one is for you. I barely even noticed the carrots and mushrooms when I was eating. That being said, it was not as creamy as I would like. I might recommend adding like 30% more if you make it. But also it was totally fine! I just had a slightly more sinful and gooey image in my mind when I was chopping away.

Also, if you aren't into burrata... no big deal. I ate some of my leftovers last night sans burrata and it was just fine. The burrata adds a wonderful creamy-ness to this dish that just about anyone can get behind.
  1. In a medium saucepan, set over medium heat, add the olive oil. Add the carrot, red bell pepper and diced mushrooms. Cook until softened, about 5 minutes. 
  2. Add in the minced garlic, marinara sauce, salt and crushed red pepper and 1/4 cup of water. Bring the sauce to a simmer and reduce the heat to medium-low. Cook until the sauce has thickened, about 7 to 8 minutes. When the sauce has thickened, add the mozzarella and ricotta and mix it until combined.
  3. Meanwhile... cook the ziti and cook until al dente. Drain and add to the pot with the sauce and mix until the ziti is thoroughly coated in sauce.
  4. Preheat the oven to 350 degrees F. Add the ziti to a 8x8 baking dish. Top with a small sprinkling of mozzarella. Transfer to the oven and bake for 20 minutes.
  5. At the 20 minute mark, remove it from the oven. Add the burrata to the top of the dish. Think like half a ball for each person.
  6. Place it back in the oven to bake for 3 minutes longer, just until warm. Garnish with a bit of crushed red pepper and basil.
Shopping List
1 tablespoon olive oil
1 small carrot, peeled and diced
1/4 red bell pepper, diced
3 cremini or button mushrooms, stems removed and diced
2 garlic cloves, peeled and minced
1 cup tomato sauce
1/2 teaspoon salt
1/4 teaspoon crushed red pepper flakes , plus more for garnish
1/4 cup water
1/4 cup shredded mozzarella, plus more for topping
1/3 cup ricotta
1 ball of burrata
1/2 pound ziti
Basil leaves, for garnish

harvest loaf with maple butter

10.15.2019

Technically this is a pumpkin loaf... but I don't want to call it that.

I'm not a huge pumpkin flavor person. I've never been one for a pumpkin spice latte. Pumpkin pie? No thanks. I do get on board with other seasonal flavors. Gingerbread, peppermint, etc. It feels like there are others but I can't think of them right now.

I came across this recipe on Twitter and it won me over. I think because it was not screaming "I'm a pumpkin loaf". The most amazing part of it was that I only needed two things to make the whole recipe happen. The end result is incredibly delicious. The ginger cuts the traditional pumpkin flavor into an unexpected harvest flavor. Does that make sense? Maybe not. You'll just have to make the loaf and see.

I was feeling particularly ambitious on this occasion so I decided to make my own butter as well. While that might sound aggressive, homemade butter is very easy. It only requires patience, a stand mixer and heavy cream. Here is a link to the recipe that I have used. I flavored this batch with maple syrup and sea salt.

Key tip? Do not skip the pumpkin seeds and sugar on the top. It gives a lovely little crunch.
  1. Preheat oven to 325°. Lightly coat a 9x5" loaf pan (or two smaller pans) with nonstick spray. Line bottom of pan with parchment, leaving a generous overhang on both long sides.
  2. Whisk flour, cinnamon, kosher salt, baking powder, baking soda, nutmeg, and cloves in a medium bowl.
  3. Whisk eggs, pumpkin purée, ginger, and 1½ cups sugar in a large bowl. Stream in oil, whisking constantly until mixture is homogeneous. Gently fold half of dry ingredients into egg mixture until no dry spots remain. Repeat with remaining dry ingredients.
  4. Transfer batter to prepared pan. Scatter pumpkin seeds over batter. Sprinkle seeds with remaining 1 Tbsp. sugar. 
  5. Bake bread, rotating pan once halfway through, until a tester inserted into the center comes out clean, 80–90 minutes for larger pan or 50-65 minutes for two smaller pans.
  6. Let cool slightly, then run a knife or small offset spatula around pan to help loosen bread. Using overhang, transfer bread to a wire rack and let cool.
Shopping List
loaf
Nonstick vegetable oil spray
2½ cups all-purpose flour
2 tsp. ground cinnamon
2 tsp. kosher salt
1 tsp. baking powder
½ tsp. baking soda
½ tsp. freshly grated nutmeg
⅛ tsp. ground cloves
2 large eggs
1 15-oz. can pumpkin purée
1 Tbsp. plus 1 tsp finely grated ginger (from about one 3" piece fresh ginger)
1½ cups plus 1 Tbsp. sugar
1 cup extra-virgin olive oil
½ cup raw pumpkin seeds

butter1 cup heavy cream
1/4 cup maple syrup
sea salt

turkish-style beef and eggplant stew

This weekend I very intentionally flipped through several of my recipe books to find a new recipe to make. After a couple books, I found things that I would want to make some day but not right now. While I don't have a million cookbooks, I certainly have enough that it would be great to find some inspiration from them in the kitchen as opposed to just for decor.
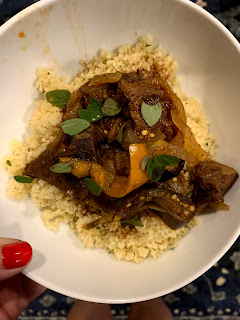
I ended up finding this recipe in a fall edition of Real Simple magazine. It was not lying when it said 20 minute prep time. I barely did any work here. In fact I did more work taking pictures of the meal cooking over 6 hours than I had done preparing it.

In short, I highly recommend this for people who are busy or just want to be surprised by a tasty meal on their counter 6-8 hours later. I will say it has certain "intensity" or "heat" to it that might not be super suitable to kids? I'm not sure what kids eat. I'm not a person that loves hot flavoring but you could just cut back on the crushed red pepper.

Bonus for this meal? The eggplant came from my garden and the peppers came from my Dad's. I love when a meal that isn't a caprese salad can be made from our gardens. The eggplant variety is called "patio baby eggplant" which is why they are so tiny. I love them for that - perfect for recipes and sharing with friends and neighbors.
  1. Combine vinegar, tomato paste, cumin, Aleppo, salt, black pepper, and ¾ cup water in cooker. 
  2. Add beef, eggplants, bell peppers, and onion; stir to combine. 
  3. Cover and cook until meat is very tender, 6 to 7 hours on low or 4 ½ to 5 hours on high. 
  4. Serve stew over couscous, garnished with oregano.
Shopping List
⅓ cup red wine vinegar
3 tablespoons tomato paste
1 tablespoon ground cumin
1½ teaspoons crushed red pepper
1 tablespoon kosher salt
½ teaspoon freshly ground black pepper
3 pounds boneless beef chuck roast, trimmed and cut into 2-in. pieces
3 small Italian eggplants (1¾ lb.), sliced into ½-in. rounds
3 medium-size red bell peppers (1½ lb.), seeded and sliced
1 large yellow onion, chopped
Cooked couscous and fresh oregano leaves, for serving

amazing chocolate chip cookies

10.09.2019

Does actually sifting flour make a difference in cookies? Maybe. 

All I know is these cookies are delicious. They are beyond simple. Just a chocolate chip cookie. I refuse to compare the recipe to another one because I need to believe the recipe is a little bit of magic.

In full disclosure, this recipe is from The Gilded Hotel in Newport. I stayed there earlier in the Fall for a birthday weekend. The place was super cute but they also served chocolate chip cookies nearly on command. There were cookies at 4pm when we were getting ready for dinner.... and again at 1:30 AM when we got home for the night.

Did I eat a chocolate chip cookie in bed? No. I ate two.

When we were checking out the next morning, I casually asked if they ever gave out the recipe. Without even a second thought, they gave it up. I love when people share like that. Why keep all the good stuff for yourself? I'm still busy telling everyone how amazing the all the food was at this hotel.

One night this week I finally got around to making these cookies for myself. I made the whole batch but only baked 6 cookies - thankfully. Were they the same as The Gilded? No. Not quite. I think they use more dough per cookie... and as a result they have a little more volume. But I did eat all the cookies I made in 1 day. And if we are being honest, I've eaten a little bit of the dough several times.
Here's how it goes.
  1. Preheat oven to 350. Line baking sheet with parchment 
  2. In a bowl, sift together flour, baking soda and salt 
  3. In mixer, combine butter, brown sugar and granulated sugar. Beat until combined. Add egg and vanilla. Add in dry ingredients bit by bit, mixing until combined. Add in chocolate chips. 
  4. Drop cookies onto baking sheet using a cookie scoop or ice cream scoop. Bake cookies until golden brown, 12-14 minutes. Top with sea salt. 
Shopping List
1 ¼ c flour
1 tsp baking soda
½ tsp salt
½ c butter, room temp
½ c packed brown sugar
6 tbsp sugar
1 egg
1 tsp vanilla
2 c semisweet chocolate chips
Sea Salt 

butterfly party

10.06.2019

This year I have inadvertently - and wonderfully - become a home to so many butterflies. It is wonderful. I am sure that I say this somewhat regularly... but I have not gotten so much joy and relaxation from something unintended recently. 

I planted these Mexican sunflowers in my garden that have grown to be maybe 8 feet tall. They are quite high. They are also a magnet for the monarch butterflies in the last month or so. One day I was out in the garden and there were so many that I could not keep count. When I tried to take a picture of it I saw more than I hadn't noticed in real life. 

Watching the butterflies provides an incredible sense of peace. In the mornings when I'm sitting on my front porch, I have seen them fly around the corner of the house and head to the garden. It's as though they are commuting to work the same way the cars are driving by. Standing in the garden they bounce from flower to flower doing their thing. I never understood the draw of a "butterfly bush" but now I do. I could sit and watch them all day long. 

The only challenge will be how to plant for them next year. I need more sunflowers than Mexican sunflowers but don't want to lose my butterfly population. Might have to get creative about my garden layout. A perfect problem to try and solve during a snowstorm in January.


best quiche ever

10.01.2019

A couple weeks back I had the best quiche ever. It made me realize how lazy and terrible my quiches had been to date. I just would mix eggs and milk and call it a day. BUT, this new quiche was so perfect. I legit could not stop talking about it at the brunch.

I came home with the motivation to drastically improve my quiche. I knew right away that the answer would not be low calorie. I was adding way too much egg and needed to swap that with some heavy cream. I did some quick googling and came upon a recipe literally titled "Best Quiche Recipe". My suspicions were true.... more heavy cream and whole milk.

This recipe did help me realize two things. One? I'm not sure where my pie plate is. Two? I forgot that I threw out my pastry brush last Spring.

What did I learn this time?

  • Springform pan // Wonderful swap. I love how deep it makes the quiche and the overall structure. It does however essentially double the cooking time.
  • I never use pie weights // Not once in my life have I par baked a pie crust to the specifications in a recipe. I've lived to tell the tale but I do wonder how much better my crusts would be if I did this.
  • Custard // This is crucial. I am not sure what the difference is between "eggs + milk" and "custard" but there is absolutely a difference. So follow the recipe and you'll get a wonderfully creamy custard that does not taste "eggy".
  • Egg white seal // This seems real important. I feel like it helped to maintain the structure of the quiche and prevent leaks from happening.
  • Store-bought crust // Sometimes I like to make my own crust and then sometimes it is just easier to buy it. This isn't the worst thing in the world, it is just the easiest.

 
Here's how it goes.
  1. Pan Prep // Unroll your pre-made crust. Use your fingers to press and even out the crust into the pan. Ensure the bottom corners are tightly pressed against the pan. Stick in the freezer for at least 15 minutes or up to 2 days.
  2. Par-bake the crust // Heat the oven to 400 degrees. Line the frozen crust with a square of parchment, fill with dried beans (or another pie weight), then set on a sheet pan. Bake on the lower rack for about 40 minutes, rotating halfway through, until the crust is starting to brown along the edges and the bottom no longer looks raw and doughy. 
  3. While the crust is baking, use a fork to whisk the egg white with a pinch of salt until it’s very loose. When the crust is done, remove the parchment and beans and prick the bottom and sides of the crust a few times with a fork. Brush the inside of the crust with the salted egg white, then return to the oven to bake for another minute to set.
  4. Remove the par-baked crust from the oven to cool, then lower the oven to 325°F and turn your attention to the custard.
  5. Make the custard: Combine the cream, milk, and flour in a bowl. Whisk until smooth. Add the eggs, egg yolk, salt, and pepper, and whisk until smooth.
  6. Fill the quiche: Sprinkle half of the cheese evenly over the bottom of the crust. Sprinkle the mix-ins on top, spreading them out as much as possible. Make sure that you can see the cheese and crust below - the custard filling needs to be able to get through. Sprinkle the remaining cheese on top. Slowly and evenly pour in the custard, taking it as high to the brim as possible. 
  7. Bake the quiche for 55 to 65 minutes, or until it no longer shimmies when shook. (If the crust starts to brown too much mid-bake, you can carefully tent it with foil.) Let cool until warm before serving.
Shopping List
1 cup heavy cream
1 cup whole milk
3 tablespoons all-purpose flour
5 large eggs
1 large egg yolk
1 3/4 teaspoons kosher salt
3/4 teaspoon freshly ground black pepper
1 to 1 1/4 cups mix-ins
1 cup grated cheese

summer salad

9.25.2019

Good news. You can make healthy food even better with two small tricks. One? Cut the vegetables into adorable shapes like half moons. Two? Make this super easy dressing and pour it all on.

Last weekend I stayed at The Gilded in Newport. The food was so amazing that since checking out I have asked for two of their recipes... and they have actually emailed them to me. At some point in the near future I will absolutely be making their chocolate chip cookies, but until then I make a version of their incredible tomato salad. 

Their tomato salad was a bit different than mine. I refused to go to more than one grocery store (TJ's doesn't have fava beans) and needed to amp it up a bit to be more filling. The real reason this salad is amazing is the dressing. It is so light and flavorful without being too much of anything. You don't feel like you are eating a bowl of cilantro. I can see myself making a dressing like this for many years to come. 

Changes I made:
- Swapped fava beans for chick peas. This was "fine" because I had the chick peas on hand, but the salad really needs something light, and crisp. Fava beans would be perfect but the chick peas meant I didn't go to another store.
- Added chicken sausage. I will put chicken sausage in just about anything. I love it. This boosted the salad to be just a touch more filling.
- No onion. Pretty much just because I was too hungry and forgot. I would do this next time if I remembered, but it was still pretty great without it.

What makes this salad so amazing? It's the combination of the herby, light dressing with the yogurt on the bottom of the dish. I was doing everything I could to scoop up that goodness and be a member of the clean plate club. Do not skip the yogurt.

Here's how it goes.
  1. Combine all the dressing ingredients. Blend together using a food processor / immersion blender / whatever you want. It is worth doing this mechanically because it really changes the texture of the dressing.
  2. Chop and prep the rest of your salad ingredients. Mix well to coat with the dressing. Let rest in the fridge for 20 minutes.
  3. Right before serving, spread a dollop of yogurt in the bottom of each dish. Lightly salt the yogurt and then top with the dressed salad
Shopping List
dressing
Approx 3 tbsp roughly chopped mint (12 g)
Approx 3 tbsp roughly chopped cilantro (12 g)
2 cloves of garlic, crushed
5 tbsp lemon juice
1/3  cup olive oil, plus extra to drizzle
¾ tsp coarsely ground black pepper

salad

1 cup garden tomatoes, halved
4-5 radishes, halved & thinly sliced (half moons)
1/2 cup limas/favas
3 mini cucumbers, peeled and chopped into cubes or half moons
1 spring onion, thinly sliced

For the love of old windows... and old friends

9.22.2019

I was in Newport for the weekend - which was lovely. 

It was such a special occasion celebrating one of my oldest friends. Although 11 years might actually not be that long, we have certainly done a whole lot of living in those 11 years. Learned a whole lot of lessons. Mostly good ones, which is nice.

The weekend was spent mostly outdoors which is my favorite place to spend time. So few pictures were taken that it is challenging to write a post about it - but I've found myself recently passing on past posts to others... and given that, any post is a good post. 

Slept At: Gilded Hotel
This place was aggressively quirky and cute with a super loud design decor. I tend to skew more towards traditional, New England looks but this was very bold - and wonderful. But the best part might be the hospitality. There was a great tea selection (I'm an old woman at heart) and peaceful little courtyard with a fountain. The homerun of it all was really the homemade chocolate chip cookies that magically showed up at the right time - even 1 am when we got home from the events. 

The next morning there was this thing called "small plate breakfast" which could be annoying - but was actually really wonderful. I've already emailed the hotel for the tomato salad recipe. It was delicious. Turns out if you put tasty food in very small plates people will love it. Even the super small diced watermelon.


Socialized At: New York Yacht Club, Harbour Court
The event was at the NYYC. From any of my research and all the signs, I know that phones are not permitted anywhere and cameras are not cool either. There is apparently a small loophole if you go outside and down the very steep hill. So that is what we did. 

I love a good house with history, plus a giant flagpole and sweeping views didn't hurt either. The passed appetizers were delightful. I absolutely consumed more than my fair share of deviled eggs and roasted golden beets. Would also like the recipe for those beets. 


Night Activities: Everywhere
One of the planning people wrote up a treasure map of sorts to keep everyone on track after the cocktail party. I honestly have no idea where we went all night mostly. All I know is that it was not too far, but far enough for my tender little feet in heels. They are highly accustomed to sneakers and Birkenstocks... not 3 inch heels on cobblestone streets. My how life has changed.
  1. Perro Salado --> adorable patio area with even cuter lights. absolutely must go here.
  2. The Fastnet --> Good amount of space plus there is darts... and the majority of the walls can be written on in chalk. Sounds fun right?
  3. Buskers --> Standard Irish pub
  4. Benjamins --> there are a lot of stairs to get to the great stuff - but there is this upper deck area that is wonderful. Go all the way to the tippy top. 

Morning Stuff: Assorted
I'm an early bird so I got in a lovely walk of the Newport streets before the actual brunch and the hotel brunch. Yes, I ate twice. The old houses are great in Newport but it is really the amazing older windows that I'm in love with. You simply cannot buy them like this anymore. 

The actual brunch was delicious. If I spent the entire last evening telling everyone about the roasted beets, I spent the morning talking about the kale and bacon quiche. It is by far the best quiche I have ever had. I have a renewed interest in figuring this out for my home life.  I do think the secret might be a lot of heavy cream. That's okay.
 

eggplant parm

9.19.2019

Woah. I had no idea that these little bitty eggplants could be so delicious. I think I have always turned away from eggplant parmesan because of the eggplant. In hindsight that is truly ridiculous because nothing can be terrible when you cover it in cheese.

When I was planning my garden this year, I really wanted to include a patio baby eggplant. The patio baby produces plants that are much smaller than traditional plants. They are ideal for growing on patios (obviously) and for people who don't need a ton of large produce (single people). I did try to grow this same variety last year but it was largely unproductive.

The plant has been bursting with little eggplants for much of the summer but I didn't get around to really using them until this week. Until now I've been forcing them on people who come for tomatoes. You want some fresh tomatoes? Take an eggplant as a bonus item.

Making eggplant parm doesn't take a lifetime but it does have more steps than I'd otherwise subscribe to on a weeknight. You have to prepare each eggplant slice, fry it, and then bake the whole thing. It's just one step too many for me but I'm glad I made it happen. This was delicious. There are probably a million eggplant parm recipes out there but this is the one I started with. Like all of my recipes, I never really follow the instructions to a T.

A few notes:
Eggplant slices // Really stick with 1/2 inch slices. Anything less than this and I think they are too floppy and won't hold the breadcrumbs that well.
Double Dip // I double breaded the eggplant slices. It was worth it. In other words, egg --> breadcrumbs --> egg --> breadcrumbs --> fry it up.
Eggplant size // Since I was using a smaller variety of eggplant, I think mine also retained less moisture. As a result, I didn't need the full hour to pull moisture out (see below for more context). I do think this step is a game changer. I can't imagine making eggplant parm and it being soggy. No thanks.
Pasta // I served this over some linguine with more tomato sauce but you can do many other things. I might eat some of the leftovers in a sandwich or perhaps over some pesto pasta. Seems a bit wild, but I feel like it would be good.

Some bonus points for this recipe? Nearly all of the ingredients came from my garden or my neighbor's. I grew the eggplant and basil. The tomato sauce was made from my tomatoes over the prior weekend. It is literally just tomatoes, no onion, garlic, etc. So pure tomato goodness. The eggs for the breading came from my Aunt's chickens next door. Only ingredients that were bought? Breadcrumbs and cheese. So incredibly satisfying - and delicious.
  1. Salt both sides of your eggplant slices and place them in a large colander in the sink. Let the liquid drain for 45 minutes to 1 hour. Brush off the excess salt when you are done so they aren't too salty!
  2. In 2 shallow dishes, add breadcrumbs to one and whisk eggs and milk in the other. Dip both sides of eggplant slice into milk/egg mixture then cover with breadcrumbs, shaking off the excess. Repeat. Place on large baking sheet and repeat until all eggplant slices have been coated.
  3. Preheat oven to 375 degrees.
  4. Heat a skillet over medium high heat and add 1 tbsp. of vegetable oil into the skillet. Once the skillet is hot, add eggplant slices at a time to the skillet and cook on both sides until golden brown, remove and set back on baking sheet. Repeat until you've pan-fried them all.
  5. In a large casserole dish, add 1 cup of tomato sauce to the bottom of the casserole dish. Add a layer of eggplant slices, then sprinkle cheese. Repeat sauce, slices, cheese layers until you don't have any left. For the very top be more generous with the shredded mozzarella and sprinkle on some bonus parmesan cheese. 
  6. Bake for 20-25 minutes, or until the cheese is bubbly and slightly crisp on top. If needed, you can pop it under the broiler to get cheese crispy.
  7. Serve hot and top with torn basil.
Shopping List
1 large eggplant, sliced into 1/2" thick slices
2 tbsp kosher salt
1 1/2 cup breadcrumbs
2 eggs
1/2 cup milk
4 tbsp vegetable oil, for lightly pan-frying
3 cups tomato sauce
2 cups mozzarella shredded
1 cup parmesan cheese
Handful of fresh basil leaves chopped
© WHAT JEN DOES • Theme by Maira G.