peppermint swirl macarons

11.27.2019

While the internet and social media can sometimes be terrible places, they have brought two wonderful things into my life. Cake decorating and macaroon videos. Both of which collided into this peppermint macaroon. 
With each passing recipe, I'm growing less and less scared of piping bags. I have also been watching the "Great British Baking Show" each night so I'm sure that helps too. 

The peppermint swirl would be better accomplished with gel food coloring but I'm not about to buy more food coloring until I finish what I have. I'm stingy like that. In full disclosure, I also used some leftover buttercream that I froze from this summer from the not so successful matcha coconut macarons. It worked like a charm and I love the coconut flavor... it was not too aggressive with the peppermint either.
  1. Set your oven to 325 F
  2. Combine your almond flour and powdered sugar in a flour sifter and sift until you have a nice, pretty pile. 
  3. In a mixing bowl, beat your egg whites with an electric mixer until nice and foamy. Gradually add the granulated sugar until they develop stiff, glossy peaks. I added my sugar in 1 tablespoon at a time. If you think your egg whites are stiff enough, they probably aren't. Keep going. One blog I read said you should be able to flip your bowl upside down ... I make enough of mess in the kitchen without doing this step, but you get the idea.
  4. Add peppermint extract and mix gently. If the mixture gets a little less stiff, just toss that mixer on again for a jiffy.
  5. After the meringue is stiff and glossy, you essentially get to mix it all up again - but none of that "folding in the egg whites" business. This is straight mixing folks. Add about half of the flour/sugar mixture and stir with your spatula until mixed. Then, add the rest and stir again.
  6. This is now a "crucial" part in the macaron process.... you need to stir until the mixture is even and smooth. A smooth mixer makes for good meringues and that is what this is all about folks. What you do is spread the batter against the sides of the bowl, then flip it back into the middle, and repeat. And repeat. And repeat times 15 or so times. Just like the flour sifting process, I thought this would be all phony and silly and not worth it, I was wrong. You can see the difference in the batter. Add in food coloring until you get the shade of green you'd like.
  7. Fill your "pastry" bag with the batter and add a few drops of food coloring. Using a knife or cake tester (something thin), gently poke down and swirl around.... not mix. 
  8. Using your pastry bag, gently squeeze the mixture out into small circles on your parchment lined baking sheet. Note: the batter will settle a bit so, don't worry too too much about having a "tip" in the middle of your circle. Just try and keep your circles in similar small sized circles - about 1.5-2 inches.
  9. After you have filled you pan with little circles, whack the sheet against the counter several times. According to the post I read, "This will set the pied or little pastry lip at the base of the cookie (an essential for an authentic macaron)." Now, set the tray aside for 30 minutes to dry. You'll know they are dry when you tap the surface of the circle and it does not stick to your finger.
  10. Place in the oven for about 8 minutes. After 8 minutes, turn the sheet so that the front-facing macarons are now towards the back of the oven for an even bake. If after 14 minutes, they are still super-soft, reduce heat to 275°, cover in aluminum foil and bake for 2 more minutes. Watch them carefully.
  11. When the macarons are done baking, take them out of the oven and let sit until cool. When they are cool, they'll pop right off the parchment but they won't before then.
  12. Fill a new pastry bag with the filling and create about 1/2 inch dot on one macaron cookie, then sandwich another on top. Be careful not to squeeze the filling out on the sides.
  13. That's it. Now eat them... and store them in the fridge.
Making the Filling
  1. In a stand mixer with a whisk attachment, cream butter on high speed until light and smooth (about 5 minutes).
  2. Reduce the speed to low and add powdered sugar. Mix until fully incorporated.
  3. Add any flavoring and mix on high speed until light and fluffy (2-3 minutes).
Shopping List
2/3 cup almond meal/flour
1 1/2 cup powdered sugar.
3 egg whites
5 tablespoons of white, granulated sugar
1 teaspoon peppermint extract
red food coloring

Filling
1/2 cup softened butter
1 1/3 cup powdered sugar
1 tsp flavored extract

my new christmas ornaments

11.21.2019


If you want to unnecessarily get people excited, tell them you need child-safe ornaments on your Christmas tree. The real story is that sweet Ginger Rose wagged her tail just right to sling one off the tree and shatter it against the table.

I knew time was ticking a bit on the ornaments I made in 2015. They are glass balls and by some miracle they made it four years without shattering one. But - I have more kids running around here these days and it was time for a change.

I like making things myself instead of buying them. Plus, then I don't feel bad when I want something different. There is limited emotional attachment to those 60 glass ornaments from 2015. Sure I do remember making them and having fun and then letting my family each make a couple - but it wasn't like I was on a special vacation and bought an ornament. For some perspective, here is the history of prior trees:
When it came time to make the ornaments this year I did a little research for some options that I thought I could pull off with yarn, balls, or fabric. But I wasn't in love with any of them. Then I stumbled upon some wooden bead ornaments on Etsy that had a Scandinavian vibe... and loved them. Thankfully Amazon Prime delivered me a whole pile of beads the next day and I was in business.

I love how neutral the ornaments and how they are all different from each other. I used every single one of my 500 beads.

peppermint meringues

11.16.2019

I've skipped right over Thanksgiving and into Christmas.

While I normally am eager to make the switch, I feel more aggressive than normal. My excuse for decorating in November used to be that I was taking advantage of having Veteran's Day off from work.  However this year, I'm just plain aggressive. I had my outdoor decor all set up a week for about a week before I turned on the lights.

In the spirit of being extremely ready for the Christmas season, I also took care of my Christmas Cookie Swap. My friend Becca of The Salted Cookie runs a swap each year. Last year I made these matcha cookies. They were good but not really amazing. I am terrible at melting chocolate... and then the subsequent dipping of cookies into the chocolate felt clumsy. 

I can't remember where I saw this initial recipe but the person talked about how irresistible these little meringues were - and they were right. They are just sweet enough and just peppermint-y enough and just the right size... you can't resist popping a couple of these into your mouth. I challenged myself to use a piping bag for this and it was quite messy in my kitchen. I'd absolutely like to get better at piping since it would be a nice addition to my cake and macaron skills. 
  1. Preheat oven to 200 degrees F. Line 2 baking sheets with parchment paper, set aside.
  2. In a large bowl beat the egg whites, cream of tartar, peppermint, and salt with a mixer on medium until soft peaks form. Gradually add the sugar, 1 tablespoon at a time beating on high. Beat well after each addition. Beat until stiff peaks form.
  3. Place a pastry bag fitted with a large star tip inside a large cup and fold excess over top of the cup. This will help hold the pastry bag in place making it easier to paint the stripes and fill with meringue. If desired, using a small paintbrush paint small stripes up the sides of the pastry bag. Carefully spoon the meringue into the bag. Pipe 1" diameter cookies onto prepared baking sheet about 1" apart.
  4. Bake for 1 1/2 hours or until meringues appear dry and firm when lightly touched. Remove and cool on a wire rack.
Shopping List
3 large egg whites
1/4 teaspoon cream of tartar
1/4 teaspoon pure peppermint extract
3/4 cup granulated sugar
Red food coloring (the gel kind works best)

ricotta banana bread

11.14.2019

Ricotta is often on the list of things I fail to finish in my fridge. A recipe will call for a half cup and then it'll just sit there slowly expiring with my good intentions. But - if I'm going to make budget decisions and buy generic cereal... I should also be mindful of my wasted $1.50 on the remaining ricotta.

Coincidentally, my mom dropped off some surprise bananas a few weeks ago. While my siblings will eat bananas as a snack, I only eat them baked. Brief flashback to the banana cakes from earlier this summer: banana cinnamon cake, cinnamon banana muffins, and banana hazelnut cake. Thankfully, ricotta can be used in a banana bread. Ricotta will give it a very moist result.... unfortunately I slightly overcooked this so some of the moisture wasn't there. But, I would definitely do this again.


  1. Preheat your oven to 350"F
  2. In a medium bowl whisk together the olive oil or melted butter and sugars together until creamy.
  3. Add the vanilla extract, ricotta cheese and heavy cream and whisk until everything is incorporated. Whisk in the eggs until you have a smooth mixture. Add the bananas and walnuts and gently toss to coat.
  4. In another large bowl whisk together all the dry ingredients: flour, baking powder, baking soda and sea salt. Make a well in the middle and pour the wet mixture inside.
  5. Using a spatula gently fold all the ingredients together.
  6. Grease a loaf pan with a dab of butter or oil and pour in the mixture.
  7. Sprinkle a few walnuts on top for garnish.
  8. Bake in the preheated oven for 1 hour or until a toothpick inserted in the center comes out clean. Transfer to a wooden cutting boar and allow to cool on a cooling rack.

Shopping list
1/2 c melted coconut oil
1/2 c white granulated sugar
1/3 c brown sugar
2 large eggs
2 tsp vanilla extract
1/2 c whole milk ricotta cheese
1 tbsp heavy cream
1 1/2 c all-purpose flour
1 tsp baking soda
1/2 tsp baking powder
3/4 c walnuts -roughly chopped + a few for garnish
2 bananas

green tomato walnut cinnamon bread

11.06.2019

 
I've been holding on to tomato growing season as long as I possibly could. I really pushed the limits this year.... but I also believe that I really utilized my tomatoes as best as I ever have. I have processed and canned a whole lot of sauce. It has been living in stacks on my kitchen counter since mid-September so time to divide up the winnings and store for Winter.

I worked pretty hard to ripen the most tomatoes possible but still ended up with many green ones. There are some fairly traditional recipes for green tomatoes: fried green tomatoes and relish. I didn't not have it in me to do any more canning so I turned to a 3rd option.... this green tomato bread. I think you can put it in the zucchini bread bucket if you are looking to classify it. 

Frankly it would be hard for this bread to be disappointing. It has all the components for success: butter, sugar, and cinnamon. The tomatoes are finely diced enough that they don't affect the consistency of the bread the way bananas sometimes do (which by the way I have a couple sitting on my counter waiting for me to tackle). To make this bread a little different, I added in walnuts and raisins. I used just what I had on hand but I would probably opt for golden raisins next time since I feel like they are sweeter.

This was so easy to make that I might pull a few more tomatoes off the vines before the next cold snap comes through... maybe there is another batch of green tomato bread in me before I put up my Christmas trees.

  1. Preheat oven to 350F. 
  2. Grease and flour two 9x5-inch loaf pans.
  3. Blend butter and sugar until smooth in a stand mixer. Add in eggs one at a time and blend until smooth.
  4. In a separate bowl, combine tomatoes, walnuts, vanilla extract, and salt together in a large bowl until well blended. 
  5. Mix flour, cinnamon, baking soda, and baking powder together in a separate bowl; stir into egg mixture until just blended. 
  6. Spoon batter into prepared loaf pans.
  7. Bake in the preheated oven until a toothpick inserted in the middle of each loaf comes out clean, about 1 hour. Let cool in the pans for about 10 minutes before transferring loaves to wire racks to cool completely.
Shopping List
2 cups finely diced green tomatoes
2 cups white sugar
1 1/2 cups chopped walnuts
1 cup canola oil
2 eggs
1 tablespoon vanilla extract
1 teaspoon salt
3 cups all-purpose flour
1/2 cup raisins
1 tablespoon ground cinnamon
1 teaspoon baking soda
1/4 teaspoon baking powder

pumpkin brown butter mac and cheese

11.05.2019

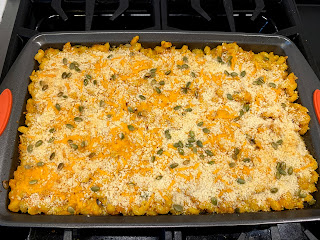
Here is another dish to sneak some veggies into your diet... also who doesn't love mac and cheese? I was hosting a small gathering for Halloween. Halloween is a big holiday in my neighborhood. Houses don't go crazy with decorations but there are endless amounts of kids running around. I buy my candy in bulk from Amazon and simultaneously pray that they come and eat it all ... and also that I don't run out.

I fell in love with this recipe from Food52 because it optimizes for crunchiness. We are a family that would fight to the death over the corner pieces from a Stouffers mac and cheese. There were some comments that it could be cheesier - and I get that. So if that is you, just amp up the cheese but honestly I loved it! You get a bit of a crunch on the bottom of the pan and on the top. The pumpkin seeds (aka pepitas) were a hit as well. My mom commented on them several times.

Here's how it goes.
  1. Heat oven to 475°F. Grease a 11x17-inch sheet pan with rimmed edges.
  2. Bring a large pot of water to a boil. Add the noodles and cook for only 4 to 5 minutes, so they’re quite al dente—just soft enough that if you taste one, there's no audible crunch. Reserve 1/2 cup of cooking water and drain the pot of pasta.
  3. In the same pot you used for the noodles, brown 6 tablespoons of butter: Cook over medium heat, stirring continuously, until it foams. The foam will recede, and the butter will be golden-tan. (If your pot is dark, you’ll know it’s ready when it starts to give off a deeply appealing rich, nutty scent.) Turn the heat down to low.
  4. Add the noodles back to the pot and immediately toss so your butter doesn’t stay on the bottom and burn. Drizzle in a few tablespoons of the hot reserved cooking water. Add the salt, pepper, three-quarters of the cheddar (about 12 ounces), Pecorino, and milk, and stir until you have a homogenous, creamy sauce. Mix in the pumpkin puree, adding a little more reserved water if needed to thin slightly. Turn off the heat.
  5. Transfer to the sheet pan, and sprinkle the remaining 4 ounces of cheddar, the panko, and the pumpkin seeds over the top. Bake for 15 to 20 minutes, until the panko is nice and toasted, and some of the cheesy noodles sticking out around the edges are tinged with amber spots.
Shopping List
2 teaspoons salt, plus more for pasta water
1 pound cavatappi (or other twisty pasta shape with lots of nooks for cheese to nestle into)
6 tablespoons butter, plus more to grease the pan
1/2 teaspoon white pepper (you can substitute black or rainbow if you prefer)
1 pound sharp cheddar, grated
4 ounces Pecorino Romano, grated
1 cup whole milk
1 can pumpkin puree (15 oz)
1 1/4 cups plain panko
1/2 cup shelled pumpkin seeds (pepitas), raw
© WHAT JEN DOES • Theme by Maira G.